{
  "type": "fulltext-index",
  "name": "hotels",
  "sourceType": "couchbase",
  "sourceName": "travel-sample",

// ... snip ...

}Posts tagged with 'couchbase server'
This is a repost that originally appeared on the Couchbase Blog: Hyper-V: How to run Ubuntu (or any Linux) on Windows.
I recently needed to install a Linux distro (Ubuntu being my favorite) in Hyper-V on Windows 10. I needed to do this because some internal builds of Couchbase were temporarily broken on Windows, but I still needed to use the latest builds. I’d never used Hyper-V to do this before, but it wasn’t that difficult. And the best part is that it comes with Windows: I don’t have to install VirtualBox or VMWare or anything like that.
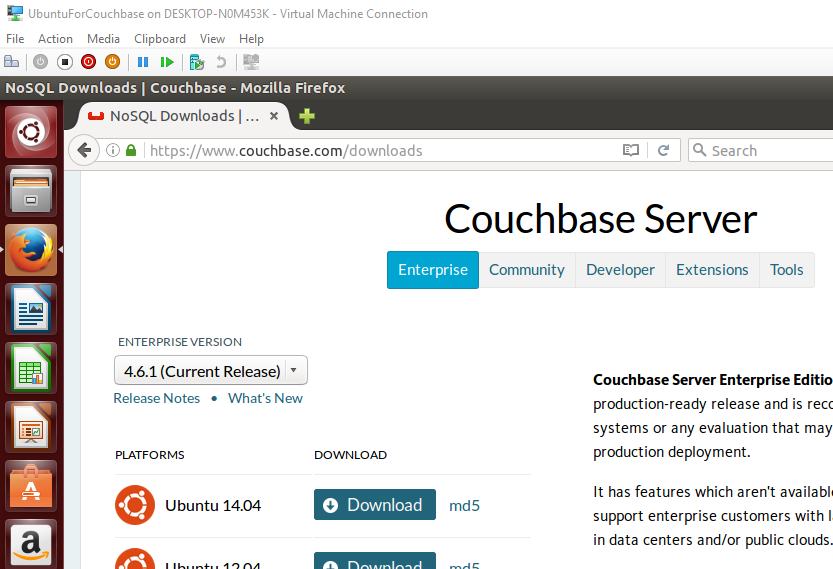
Download Ubuntu
There are lots of great Linux distros out there, and Couchbase Server can be run on a variety of them. However, Ubuntu Desktop is my go-to.
The first thing I did was to download an Ubuntu Desktop ISO. I know that Couchbase support for Ubuntu 16 is coming, but for now I want to stick to Ubuntu 14. So, I downloaded an ISO of 14.04.5 (aka Trusty Tahr).
Make sure Hyper-V is enabled
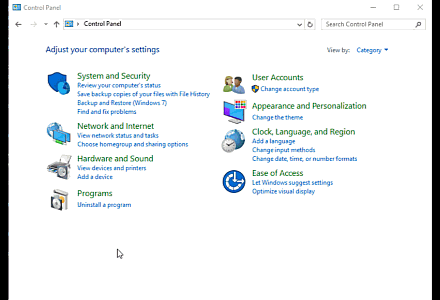
Check to make sure that you have Hyper-V enabled on Windows.
First, open Control Panel. Next, go to Programs. Then, click "Turn Windows features on or off". Finally, locate Hyper-V and click the checkbox (if it isn’t already checked).
You may also need to enable virtualization in the BIOS settings on your computer. The computer I’m using has it turned on by default. I wish I could give you instructions on how to do this, but it’s going to vary based on your BIOS.
Create a Hyper-V Virtual Switch
When connecting the virtual machine to a network, you’ll need to select a virtual switch. If you haven’t done this before, you’ll need to create one.
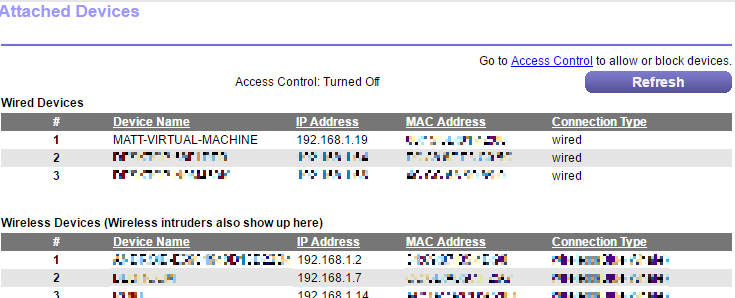
First, click "Virtual Switch Manager", then select "External". Click "Create Virtual Switch". Finally, give the switch a name. (You also need to choose an external network; in my case I only have one). Hit "Apply".
I wanted my machine to be connected to my home network, so I chose External. If you use External, it will connect to your network as a separate machine. After I create the machine (in the next section) it will appear on my router as it’s own machine:
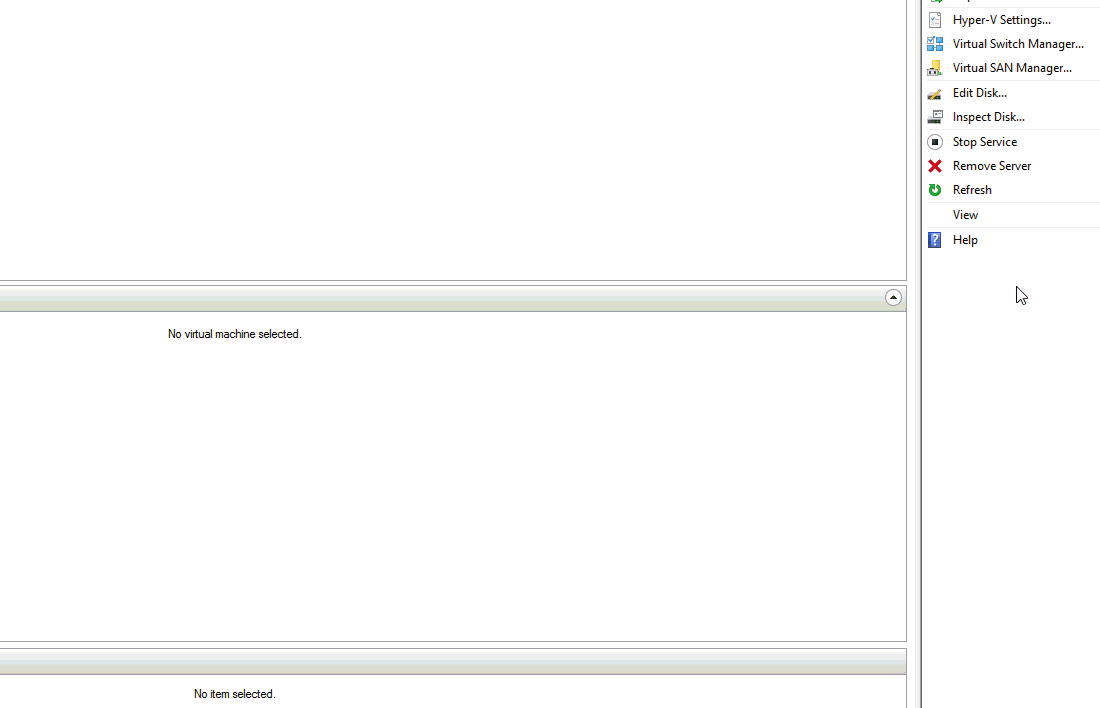
Create a new Hyper-V Virtual Machine
Now you’re ready to create the virtual machine that will be running Ubuntu.
First, open the Hyper-V Manager from the Start menu. Then, click "New" and then "Virtual Machine". This will start a wizard.
First, give your machine a name (like "UbuntuForCouchbase"). Optionally, you can choose where to store this machine, or use the default directory.
Next, you must choose Generation 1 or Generation 2. I used Generation 1, but Ubuntu 14+ should work on Generation 2 as well.
After that, specify how much memory to allocate to the machine. I have a lot of RAM on my desktop, so I gave it 8192mb.
Next, select the switch that was created in the previous section.
Then, setup the virtual hard disk to your liking. You can choose the location and size of the disk. I don’t need very much, so I went with 60gb.
Finally, you need to select an operating system. I’ll choose "Install an operating system from a bootable CD/DVD-ROM", and then "Image file", and find the Ubuntu ISO that I downloaded.
Click "Next", view the summary, and click "Finish".

Start the machine and install Couchbase
Now that you’ve created a machine, you must start it. Right-click on the machine and select "Start" (or there’s a "Start" button in the actions menu to the right).
This starts the machine, but you can’t actually see the machine yet. You have to "Connect" to the machine to see what it’s doing. Right-click and select "Connect" (or again, there’s a "Connect" button in the actions menu to the right).
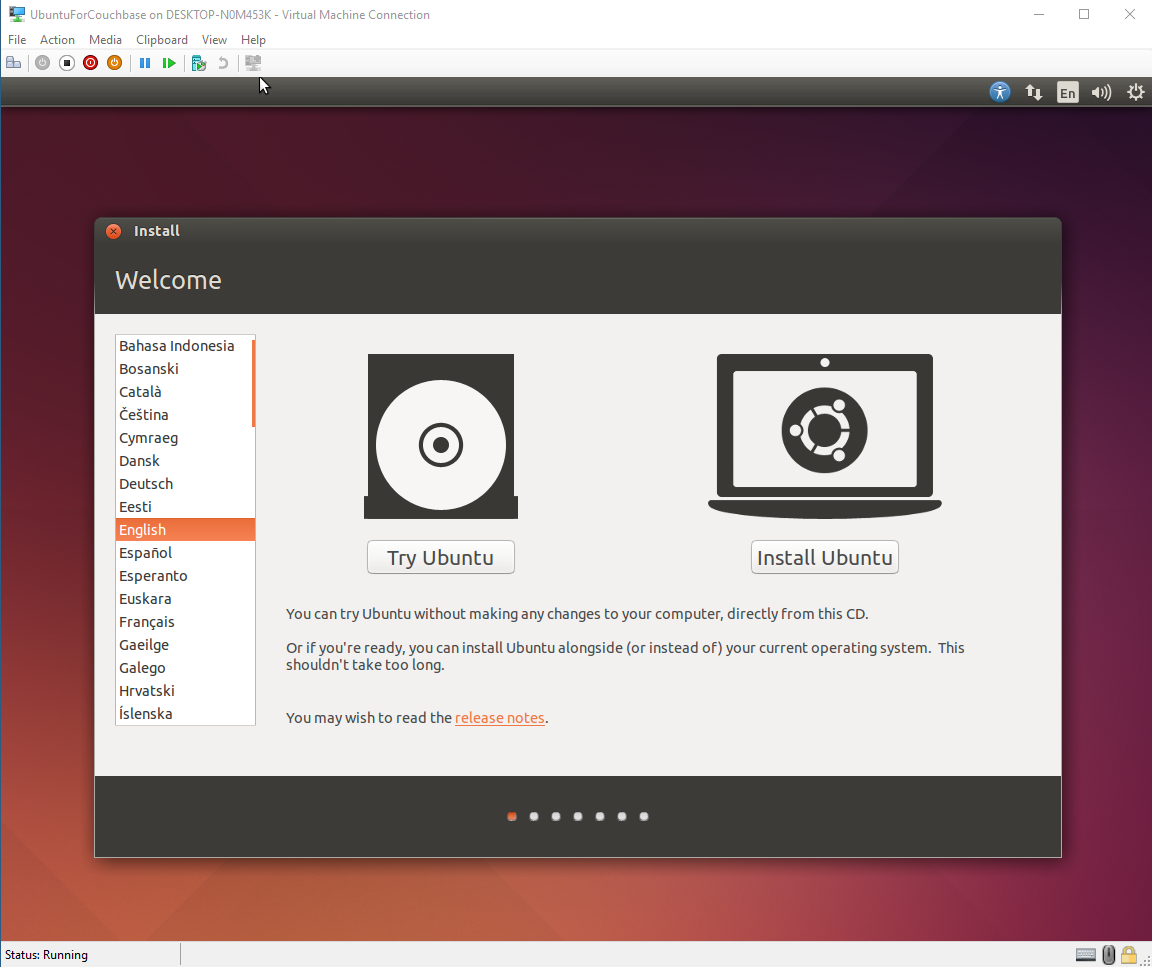
I won’t go through the installation process, since Ubuntu’s installation is pretty easy and self-explanatory (and well-documented).
At the end of the Ubuntu installation, installing Couchbase Server is also pretty easy and self-explanatory. Just go to the Couchbase downloads page and select the Ubuntu 14 version of Couchbase.
Summary
I normally use the Windows version of Couchbase, but sometimes I need to use Ubuntu (or other Linux distros). Hyper-V on Windows is a convenient way for me to spin up virtual machines.
If you have any questions about Couchbase, please ask away in the Couchbase Forums or check out the Couchbase Developer Portal.
You can also contact me at Twitter @mgroves.
This is a repost that originally appeared on the Couchbase Blog: Authentication and Authorization with RBAC.
In March’s developer build, you can start to see some major changes to authentication and authorization within Role Based Access Control (RBAC) coming to Couchbase Server. These changes are a work in progress: the developer build is essentially a nightly build that gets released to the public. But there’s some good stuff in RBAC that’s worth getting excited about!
Go download the March 5.0.0 developer release of Couchbase Server today. Make sure to click the "Developer" tab to get the developer build (DB), and check it out. You still have time to give us some feedback before the official release.
Keep in mind that I’m writing this blog post on early builds, and some things may change in minor ways by the time you get the release, and some things may still be buggy.
Authentication and Authorization
Just a quick reminder of the difference between authentication and authorization:
-
Authentication is the process of identifying that a user is who they say they are.
-
Authorization is the process of making sure the user has permission to do what they are trying to do.
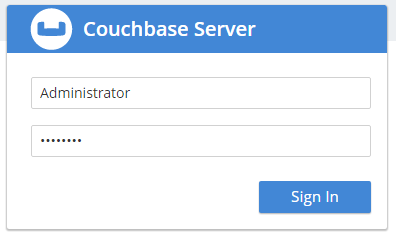
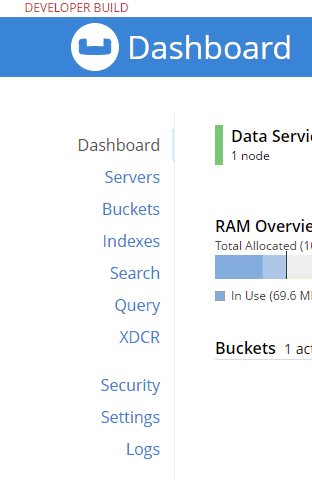
If you’ve used Couchbase before, you’re familiar with the login to what we sometimes call the "Admin Web Console".
However, the Web Console is really not just for admins, it’s for developers too. But until now, you didn’t really have a lot of control built-in to Couchbase about who can log in and (more importantly) what they’re allowed to do.
So, I’d like to introduce you to Couchbase’s new first-class user feature.
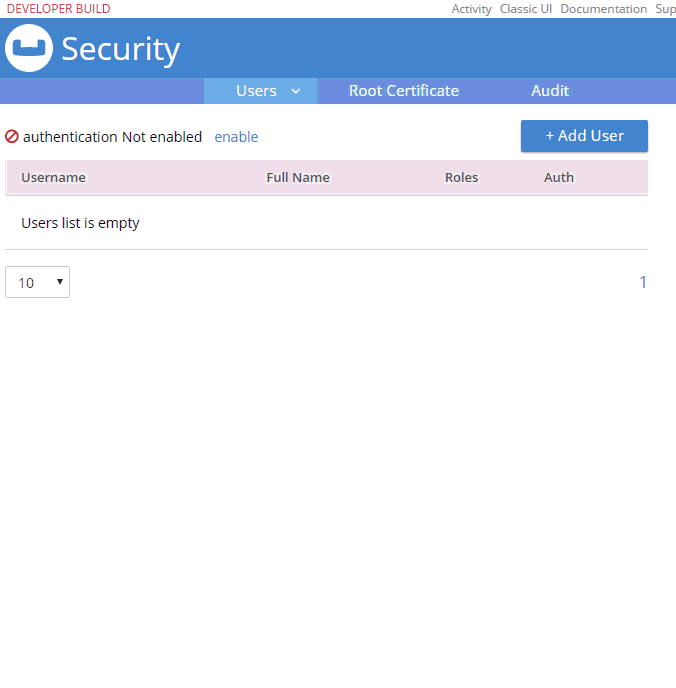
Users
There’s still a full administrator user. This is the login that you create when you first install Couchbase. This is the user who is unrestricted, and can do anything, including creating new users. So, for instance, a full administrator can see the "Security" link in the navigation, while other users can’t.
Now, once on this security page, you can add, edit, and delete users.
A user can identify a person, but it can also identify some service or process. For instance, if you’re writing an ASP.NET application, you may want to create a user with a limited set of permissions called "web-service". Therefore, the credentials for that "user" would not be for a person, but for an ASP.NET application.
Next, try adding a new Couchbase user by clicking "+ Add User". I’m going to create a user called "fts_admin", with a name of "Full Text Search Admin", a password, and a single role: FTS Admin of the travel-sample bucket (FTS = Full Text Search).
Adding a new User
Here’s an animation of adding that user:
Some notes about the above animation:
-
I selected "Couchbase" instead of "External". External is meant for LDAP integration. Note that "Couchbase" (internal authentication) will likely become the default in future releases.
-
FTS Admin gives the user permission to do everything with Full Text Searches: create, modify, delete, and execute them.
-
I granted FTS Admin only for the travel-sample bucket. If I selected "all", that would grant permission to all buckets, even ones created in the future.
-
Users with the FTS Searcher role only have access to execute searches, not modify or create them.
More on the difference between FTS Admin and FTS Searcher later.
Logging in as a new user
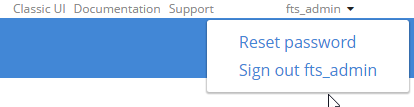
Now that this user is created, I can login as fts_admin. This user’s authentication is handled within Couchbase.

First, in the above animation, note that the fts_admin user has a much more limited set of options compared to the full admin user.
Next, it’s worth pointing out that users can reset their password:
Creating an FTS index
Since I’ve already created an fts_admin user with the FTS Admin role, I’ll create another user called fts_searcher that only has the FTS Searcher role for the travel-sample bucket.

Using the REST API for FTS
I’m going to use the REST API to demonstrate that these users are limited by the roles I’ve given them. If you need a refresher on the REST API, you can refer to the documentation of the Full Text Search API. Also note that I’m using the REST API because there are some bugs in the UI as I’m writing this.
Create an FTS index
To create an index with the REST API, I need to make a PUT request to the /api/index/<indexname> endpoint.
-
First, I’ll create an index for the 'hotel' type in the travel-sample bucket, so I’ll PUT to
/api/index/hotels -
Also, credentials can be put in the URL to use basic authentication
-
Furthermore, the REST endpoints are available on port 8094
Finally, the URL for the PUT request should look something like this:
The body of the PUT is a big JSON object. Below is part of it. You can find the full version on GitHub to try for yourself.
Normally, you can create this via the UI instead of having to create JSON by hand. I’m not going to go into FTS in much detail in this post, because my goal is to demonstrate the new authentication and authorization features, not FTS itself.
Trying to create an index without authorization
Notice that I’m using fts_searcher as the user. I know that fts_searcher shouldn’t have permission to create indexes, so I would expect a 403. And that’s just what I get.
{
  "message": "Forbidden. User needs one of the following permissions",
  "permissions": [
    "cluster.bucket[travel-sample].fts!write"
  ]
}
So, while the authentication worked, that user doesn’t have the necessary authorization.
Creating an index with authorization
I’ll try again with fts_admin:
And assuming an index named 'hotels' doesn’t already exist, you’ll get a 200, and this in the body of response:
{
  "status": "ok"
}
Using the FTS index
Next, let’s use the REST API to search the index for the word 'breakfast'.
First, make a POST to the /api/index/hotels/query endpoint, again with the proper credentials and port number.
or
Both users should be able to execute a search using that index.
Next, in the body of the POST should be a simple JSON object. Again, you don’t normally have to create this by hand — your SDK of choice or the Web Console UI can do this for you.
{
  "explain": true,
  "fields": [
    "*"
  ],
  "highlight": {},
  "query": {
    "query": "breakfast"
  }
}
Finally, the result of this search request will be a large JSON response. Look within the "hits" sub-document for "fragments" to verify that the search worked. Here’s a snippet of my search for "breakfast". Again, the full result is on Github.
// ... snip ...

        "reviews.content": [
          "… to watch TV. <mark>Breakfast</mark> was served every morning along with a copy of the Times-Picayune. I took my <mark>breakfast</mark> downstairs in the patio, the coffee was very good. The continental <mark>breakfast</mark> is nothing to…"
        ]
      },

// ... snip ...
This is a preview, expect some bugs!
There are some bugs and some incomplete features.
-
I’ve shown FTS roles here on purpose. This is because the other roles are not yet fully formed. Please try them out, let us know what you think, but remember they are not in their final form. FTS is closest to ready.
-
I’ve seen some issues when logging in as a non-admin user causes the web console to behave badly. Because of this, I showed the REST example above instead of relying on the UI.
-
Finally, there might be other bugs that we don’t know about yet. Please let us know! You can file an issue in our JIRA system at issues.couchbase.com or submit a question on the Couchbase Forums. Or, contact me with a description of the issue. I would be happy to help you or submit the bug for you (my Couchbase handlers send me a cake pop when I submit a good bug).
If you have questions, the best way to contact me is either Twitter @mgroves or email me matthew.groves@couchbase.com.
This is a repost that originally appeared on the Couchbase Blog: Moving from SQL Server to Couchbase Part 3: App Migration.
In this series of blog posts, I’m going to lay out the considerations when moving to a document database when you have a relational background. Specifically, Microsoft SQL Server as compared to Couchbase Server.
In three parts, I’m going to cover:
-
Applications using the data (this blog post)
The goal is to lay down some general guidelines that you can apply to your application planning and design.
If you would like to follow along, I’ve created an application that demonstrates Couchbase and SQL Server side-by-side. Get the source code from GitHub, and make sure to download a developer preview of Couchbase Server.
Migrate vs Rewrite
If you’re building a new web app, then Couchbase Server is a good choice to use as your system of record. Flexible data modeling, fast data access, ease of scaling all make it a good choice.
Couchbase Server can supplement SQL Server in your existing web application. It can be a session store or a cache store. You don’t have to replace your RDMBS to benefit from Couchbase Server. You can use it as your system of engagment.
However, if you’re considering making a document database your "system of record" for an existing app, then you need to plan what to do about that application (assuming you’ve already come up with a data modeling and data migration plan as covered in the earlier parts of this blog series). There are really two options:
-
Replace your data/service layer. If you’ve built your app in a way that decouples it from the underlying persistence, that’s going to benefit you tremendously when switching from SQL Server to Couchbase. If you are using an SOA, for instance, then you might not have to make very many changes to the web application.
-
Rebuild your application. If you don’t have a decoupled architecture, then you’ll likely have to bite the bullet and rewrite/refactor large portions of your application. This can be a significant cost that you’ll have to factor in when deciding whether or not to switch to a document database. I wish I could say it would be easier, that there was some magic potion you could use. But remember, even if the cost of a rebuild is too great, you can still use Couchbase Server in tandem with SQL Server.
The pieces of your stack that you might need to rebuild or replace include:
-
ADO.NET - If you are using plain ADO.NET or a micro-OR/M like Dapper, these can be replaced by the Couchbase .NET SDK.
-
OR/M - Entity framework, NHibernate, Linq2SQL, etc. These can be replaced by Linq2Couchbase
-
Any code that uses those directly - Any code that touches ADO.NET, OR/Ms, or other SQL Server code will need to be replaced to use Couchbase (and/or rewritten to introduce another layer of abstraction).
The rest of this blog post will be tips and guidelines that apply for rewriting, refactoring, or starting a new project.
What’s going to be covered
Document databases force business logic out of the database to a larger extent than relational databases. As nice as it would be if Couchbase Server had every feature under the sun, there are always tradeoffs.
In this blog post, we will cover the changes to application coding that come with using Couchbase. At a high level, here is what will be covered in this blog post. On the left, a SQL Server feature; on the right, the closest equivalent when using Couchbase Server.
| SQL Server | Couchbase Server |
|---|---|
|
tSQL |
N1QL |
|
Stored Procedures |
Service tier |
|
Triggers |
Service tier |
|
Views |
Map/Reduce Views |
|
Autonumber |
Counter |
|
OR/M (Object/relational mapper) |
ODM (Object data model) |
|
ACID |
Single-document ACID |
In addition, we’ll also be covering these important topics:
-
Serialization
-
Security
-
Concurrency
-
SSIS, SSRS, SSAS
Using N1QL
The N1QL (pronounced "nickel") query language is one of my favorite features of Couchbase Server. You are already comfortable with the SQL query language. With N1QL, you can apply your expertise to a document database.
Here are a few examples to show the similarities between N1QL and tSQL:
| tSQL | N1QL |
|---|---|
|
DELETE FROM [table] WHERE val1 = 'foo' |
DELETE FROM `bucket` WHERE val1 = 'foo' |
|
SELECT * FROM [table] |
SELECT * from `bucket` |
|
SELECT t1.* , t2.* FROM [table1] t1 JOIN [table2] t2 ON t1.id = t2.id |
SELECT b1.* , b2.* FROM `bucket` b1 JOIN `bucket` b2 ON KEYS b1.mykeys |
|
INSERT INTO [table] (key, col1, col2) VALUES (1, 'val1','val2') |
INSERT INTO `bucket` (KEY, VALUE) VALUES ('1', {"col1":"val1", "col2":"val2"}) |
|
UPDATE [table] SET val1 = 'newvalue' WHERE val1 = 'foo' |
UPDATE `bucket` SET val1 ='newvalue' WHERE val1 = 'foo' |
Thanks to N1QL, migrating your SQL queries should be less difficult than other document databases. Your data model will be different, and not every function in tSQL is (yet) available in N1QL. But for the most part, your existing tSQL-writing expertise can be applied.
Back to the shopping cart, here’s an example of a simple tSQL query that would get shopping cart information for a given user:
SELECT c.Id, c.DateCreated, c.[User], i.Price, i.Quantity
FROM ShoppingCart c
INNER JOIN ShoppingCartItems i ON i.ShoppingCartID = c.Id
WHERE c.[User] = 'mschuster'
In Couchbase, a shopping cart could be modeled as a single document, so a roughly equivalent query would be:
SELECT META(c).id, c.dateCreated, c.items, c.`user`
FROM `sqltocb` c
WHERE c.type = 'ShoppingCart'
AND c.`user` = 'mschuster';
Notice that while N1QL has JOIN functionality, no JOIN is necessary in this shopping cart query. All the shopping cart data is in a single document, instead of being spread out amongst multiple tables and rows.
The results aren’t exactly the same: the N1QL query returns a more hierarchical result. But the query could be modified with an UNNEST to flatten out the results if necessary. UNNEST is an intra-document join, which is a feature that’s necessary when writing SQL for JSON.
In many document databases other than Couchbase, you would likely have to learn an API for creating queries, and you would not be able to apply your tSQL experience to help ramp up. I’m not saying that translation is always going to be a walk in the park, but it’s going to be relatively easy compared to the alternatives. If you’re starting a new project, then you’ll be happy to know that your SQL-writing skills will continue to be put to good use!
When writing C# to interact with N1QL, there are a couple key concepts that are important to know.
Scan Consistency. When executing a N1QL query, there are several scan consistency options. Scan consistency defines how your N1QL query should behave towards indexing. The default behavior is "Not Bounded", and it provides the best performance. At the other end of the spectrum is "RequestPlus", and it provides the best consistency. There is also "AtPlus", which is a good middle-ground, but takes a little more work. I blogged about Scan Consistency back in June, and it’s worth reviewing before you start writing N1QL in .NET.
Parameterization. If you are creating N1QL queries, it’s important to use parameterization to avoid SQL injection. There are two options with N1QL: positional (numbered) parameters and named parameters.
Here’s an example of both Scan Consistency and Parameterization used in C#:
var query = QueryRequest.Create(n1ql);
query.ScanConsistency(ScanConsistency.RequestPlus);
query.AddNamedParameter("userId", id);
var result = _bucket.Query<Update>(query);
I’m not going to dive into the N1QL query language any more than this, because it is such a deep topic. But you can check out the basics of N1QL and get started with the interactive N1QL tutorial.
SQL Stored Procedures
There is no equivalent of stored procedures (sprocs) in Couchbase. If you don’t already have a service tier, and you are using sprocs to share some logic across domains, I recommend that you create a service tier and move the logic there.
In fact, I wasn’t sure whether sprocs belonged in part 2 or part 3 of this blog series. Typical tiers in an enterprise application:
-
Web tier (UI - Angular/React/Traditional ASP.NET MVC)
-
Service tier (ASP.NET WebApi)
-
Database
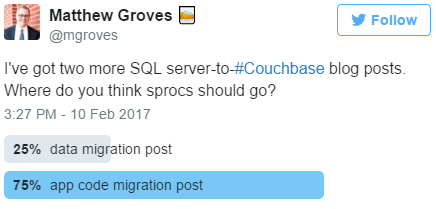
Sprocs live in the database, but they contain logic. The service tier also contains business logic. So do they count as data or functionality?
I took a Twitter straw poll to decide.
But my recommendation is that if you already have a service tier, move the sproc logic into that. If you don’t have a service tier, create one. This will live between the database and the UI.
In the source code for this series, I’ve created a single stored procedure.
CREATE PROCEDURE SP_SEARCH_SHOPPING_CART_BY_NAME
	@searchString NVARCHAR(50)
AS
BEGIN
	SELECT c.Id, c.[User], c.DateCreated
	FROM ShoppingCart c
	WHERE c.[User] LIKE '%' + @searchString + '%'
END
GO
This sproc can be executed from Entity Framework as follows:
public List<ShoppingCart> SearchForCartsByUserName(string searchString)
{
    var cmd = _context.Database.Connection.CreateCommand();
    cmd.CommandText = "SP_SEARCH_SHOPPING_CART_BY_NAME @searchString";
    cmd.Parameters.Add(new SqlParameter("@searchString", searchString));
    _context.Database.Connection.Open();
    var reader = cmd.ExecuteReader();

    var carts = ((IObjectContextAdapter) _context)
        .ObjectContext
        .Translate<ShoppingCart>(reader, "ShoppingCarts", MergeOption.AppendOnly);

    var result = carts.ToList();
    _context.Database.Connection.Close();
    return result;
}
By the way, that Entity Framework sproc code is ugly. Maybe I did it wrong? I’m not trying to slander EF, but generally, I haven’t used OR/Ms and sprocs together much in my career. Certainly a piece of ADO.NET or Dapper code would be shorter and cleaner.
This is a very simple sproc, but it introduces a basic search functionality. The benefits to such a sproc:
-
Reuse: The same sproc can be reused between different applications
-
Abstraction: The sproc implementation can be changed or improved. In this case, a basic
LIKEcould be switched out for a more robust full text search.
Any approach taken with introducing a service tier should provide the same benefits. I created an ASP.NET WebApi endpoint to take the place of the sproc.
[HttpGet]
[Route("api/searchByName/{searchString}")]
public IHttpActionResult SearchByName(string searchString)
{
    var n1ql = @"SELECT META(c).id, c.`user`
        FROM `sqltocb` c
        WHERE c.type = 'ShoppingCart'
        AND c.`user` LIKE $searchString";
    var query = QueryRequest.Create(n1ql);
    query.AddNamedParameter("searchString", "%" + searchString + "%");
    query.ScanConsistency(ScanConsistency.RequestPlus);
    var results = _bucket.Query<ShoppingCart>(query).Rows;

    return Json(results);
}
Note: for the sake of simplicity in the sample code, this endpoint actually lives in the same web project, but in production, it should be moved to its own project and deployed separately.
This endpoint holds a N1QL query that is similar in nature to the above sproc. Let’s see if it holds up to the same benefits:
-
Reuse? Yes. This endpoint can be deployed to its own server and be reused from other applications.
-
Abstraction? Again, yes. The implementation uses the naive
LIKEapproach, which we could improve by switching it to use Couchbase’s Full Text Search features without changing the API.
Instead of calling a sproc through Entity Framework, this endpoint would be called via HTTP. Here’s an example that uses the RestSharp library:
public List<ShoppingCart> SearchForCartsByUserName(string searchString)
{
    // typically there would be authentication/authorization with a REST call like this
    var client = new RestClient(_baseUrl);
    var request = new RestRequest("/api/searchByName/" + searchString);
    request.AddHeader("Accept", "application/json");
    var response = client.Execute<List<ShoppingCart>>(request);
    return response.Data;
}
If you are building a new project, I recommend that you create a service tier with the expectation of it being used across your enterprise. This allows you to have the same "shared code" that sprocs would normally provide without putting that code into the database.
This is also true for SQL Server functions, user defined types, rules, user-defined CLR objects.
Note: the above sproc example is a SELECT just to keep the example simple. In this case, you could potentially create a MapReduce View instead (which is discussed below). A MapReduce view cannot mutate documents though, so a service tier approach is a better general solution to replacing sprocs.
SQL Triggers
If sprocs weren’t already controversial enough, just bring up triggers in a conversation. As with stored procedures, I generally recommend that you move the trigger logic into the service tier, away from the database. If your software project depends on a lot of triggers, or complex triggers, or a lot of complex triggers, then you might want to wait for another project to try using Couchbase Server in.
That being said, there is some cutting-edge stuff that is being worked on that might be roughly equivalent to triggers. If you are interested in this, please contact me, and also stay tuned to the Couchbase Blog for the latest information.
Views
In SQL Server, Views are a way to store complex queries on the server, as well as provide some performance benefits. In Couchbase, Map/reduce views have been providing similar functionality for some time. For the most part, the functionality provided by views can be provided in a more expressive way with N1QL. However, views are not going away, and there are sometimes benefits to using them.
Map/reduce views can be defined and stored on the Couchbase cluster. To create them, you define a "map" function (with JavaScript) and optionally a "reduce" function (also in JavaScript).
In the Couchbase Console UI, go to Indexes → Views → Create View. Create a design document, and create a view within that design document.
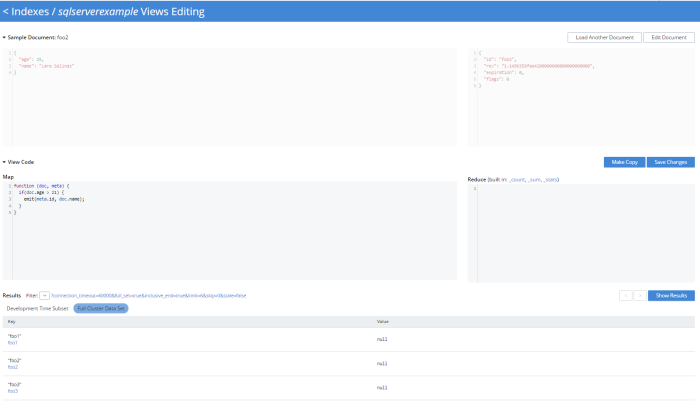
Figure 1. Screenshot of the Map/Reduce view editor in the latest Couchbase Console
At the center is the Map/Reduce code that you are working on. A sample document and its meta-data is also shown to give you some visual help, and at the bottom you have some options for executing your view.
For complete details on how views work, check out the MapReduce Views documentation.
As a quick example, I want to create a view that lists only the people who have an age greater than 21.
function (doc, meta) {
  if(doc.age > 21) {
  	emit(meta.id, doc.name);
  }
}
This view would emit the key of the document and the value of the "name" field. If my bucket contained the following documents:
foo1	{"age":17,"name":"Carmella Albert"}
foo2	{"age":25,"name":"Lara Salinas"}
foo3	{"age":35,"name":"Teresa Johns"}
Then the results of the view would look like:
| Key | Value |
|---|---|
|
"foo2" |
"Lara Salinas" |
|
"foo3" |
"Teresa Johns" |
The results of these views are updated automatically on an interval, and are also updated incrementally as documents are mutated. This means that, by default, the results of the views are eventually consistent with the actual documents. As a developer, you can specify the level of consistency (or staleness) you want. This will have an impact on performance.
Map/reduce views can be very helpful when you have very complex logic that’s easier to write in JavaScript than it is to write in N1QL. There can also be performance benefits when you are working with a write-heavy system.
Views can be accessed from .NET using ViewQuery.
var query = new ViewQuery().From("viewdesigndocument", "viewname").Limit(10);
var people = bucket.Query<dynamic>(query);
foreach (var person in people.Rows)
    Console.WriteLine(landmark.Key);
Alternatively, you could create N1QL queries instead of using Views. In many cases, N1QL will be easier to write, and the performance difference will be negligible. Unlike Views, the N1QL queries would live in the service tier. There is currently no way to store a "N1QL View" on the Couchbase Server cluster.
Serialization/deserialization
Whether you’re using N1QL, Views, or key/value operations, it’s important to consider how JSON is serialized and deserialized.
The .NET SDK uses Newtonson JSON.NET. If you are familiar with that tool (and who among .NET developers isn’t), then remember that you can use the same attributes (like JsonProperty, JsonConverter, etc). In some edge cases, it might be useful to create your own custom serializer, which is possible with the Couchbase .NET SDK. Check out the documentation on serialization and non-JSON documents for more information.
Security
Couchbase has role-based access control (RBAC) for administrators.
Couchbase can integrate with LDAP to manage Couchbase administrators and assign roles to users. Couchbase can also create read-only users internally.
There are some more robust changes and improvements coming to the Couchbase RBAC system, so stay tuned. In fact, I would recommend that you start checking out the monthly developer builds, as I expect to see some interesting improvements and features in this area soon!
Concurrency
Concurrency is something that you often have to deal with, especially in a web application. Multiple users could be taking actions that result in the same document being changed at the same time.
SQL Server uses pessimistic locking by default. This means that SQL Server expects rows to be in contention, and so it acts defensively. This is a sensible default for relational databases because denormalized data is spread across multiple tables and multiple rows. SQL Server does have the ability to use optimistic locking as well, through a variety of transaction levels.
Couchbase also offers two options to deal with concurrency: optimistic and pessimistic.
Optimisitic. This is called "optimistic" because it works best when it’s unlikely that a document will be in contention very often. You are making an optimistic assumption. On Couchbase, this is done with CAS (Compare And Swap). When you retrieve a document, it comes with meta data, including a CAS value (which is just a number). When you go to update that document, you can supply the CAS value. If the values match, then your optimism paid off, and the changes are saved. If they don’t match, then the operation fails, and you’ll have to handle it (a merge, an error message, etc). If you don’t supply a CAS value, then the changes will be saved no matter what.
Pessimistic. This is called "pessimistic" because it works best when you know a document is going to be mutated a lot. You are making a pessimistic assumption, and are forcibly locking the document. If you use GetAndLock in the .NET SDK, the document will be locked, which means it can’t be modified. Documents are locked for a maximum of 15 seconds. You can set a lower value. You can also explicitly unlock a document, but you must keep track of the CAS value to do so.
For more detail, check out the documentation on Concurrent Document Mutations.
Autonumber
Couchbase Server does not currently offer any sort of automatic key generation or sequential key numbering.
However, you can use the Counter feature to do something similar. The idea is that a document is set aside as a special counter document. This document can be incremented as an atomic operation, and the number can be used as a partial or whole key of the new document being created.
Ratnopam Chakrabarti, a developer for Ericsson, recently wrote a guest blog post about how to create sequentially numbered keys with Couchbase Server. His example is in Java, but it easy enough to follow, so I won’t repeat his example here.
OR/Ms and ODMs
If you are using SQL Server, you might be familiar with OR/Ms (Object-relational mappers). Entity Framework, NHibernate, Linq2SQL, and many others are OR/Ms. OR/Ms attempt to bridge the gap between structured data in C# and normalized data in relational databases. They also typically provide other capabilities like Linq providers, unit of work, etc. I believe that OR/Ms follow the 80/20 rule. They can be very helpful 80% of the time, and a pain in the neck the other 20%.
For document databases, there is a much lower impedence mismatch, since C# objects can be serialized/deserialized to JSON, and don’t have to be broken up into a normalized set of tables.
However, the other functionality that OR/Ms provide can still be helpful in document databases. The equivalent tool is called an ODM (Object Document Model). These tools help you define a set of classes to map to documents. Ottoman and Linq2Couchbase are popular ODMs for Couchbase, for Node and .NET respectively.
Linq2Couchbase has a Linq provider. It’s not an officially supported project (yet), but it is one of the most complete Linq providers I’ve ever used, and is used in production by Couchbase customers.
Below is an example from the Linq2Couchbase documentation that should look somewhat familiar for users of Entity Framework and NHibernate.Linq:
var context = new BucketContext(ClusterHelper.GetBucket("travel-sample"));
var query = (from a in context.Query<AirLine>()
             where a.Country == "United Kingdom"
             select a).
             Take(10);
I also used Linq2Couchbase in the sample code for this blog series. Here’s an example for Shopping Carts:
var query = from c in _context.Query<ShoppingCart>()
    where c.Type == "ShoppingCart"  // could use DocumentFilter attribute instead of this Where
    orderby c.DateCreated descending
    select new {Cart = c, Id = N1QlFunctions.Meta(c).Id};
var results = query.ScanConsistency(ScanConsistency.RequestPlus)
    .Take(10)
    .ToList();
Beyond being a great Linq provider, Linq2Couchbase also has an experimental change tracking feature. It’s definitely worth checking out. Brant Burnett is one of the key contributers to the project, and he’s also a Couchbase Expert. He presented a session at Couchbase Connect 2016 called LINQing to data: Easing the transition from SQL.
Transactions
I’ve already covered pessimistic and optimistic locking for transactions on a single document. Because of those, we can say that Couchbase supports ACID transactions on a per-document level. Couchbase does not, at this time, support ACID transactions among multiple documents.
Thinking back to the first blog post on data modeling, the need for multi-document transactions is often reduced or eliminated, compared to a relational model. A concept (like shopping cart) may require rows in multiple tables in a relational model, but a single document model in Couchbase.
If you are following a referential model, as in the social media example from the first blog post, you might be concerned about the lack of transactions. This highlights the importance of thinking about your use cases while creating your data model. If transactions are vital to your use case, the data model can often be structured to accomodate. We are happy to help you through this, just ask!
Multi-document transaction support may come in the future if enough Couchbase developers and customers ask for it or need it. So, if you go through the exercise of designing a document database data model, and transactions are still a vital part of your project, then Couchbase may not be the best "system of record" for at least part of your project. Couchbase may still be the best "system of engagement", able to help with scaling, caching, performance, and flexibility where needed.
As a side note, it may be worth checking out the NDescribe project, as it includes an SDK that works on top of the Couchbase SDK and provides a transaction system. (Note that this is not an officially supported tool).
SSIS, SSAS, SSRS
Not everyone uses SQL Server Integration Services (SSIS), SQL Server Analysis Services (SSAS), and SQL Server Reporting Services (SSRS), but these are powerful features that SQL Server has for integration, reporting, and analysis.
I can’t give you a blanket "use X instead of Y" for these, because it depends very much on your use case. I can point you in the direction of some of the tools available for Couchbase that revolve around data processing, data transformation, reporting, and analysis.
-
Kafka is an open source data streaming tool. Some of the popular use cases for Kafka include messaging, website activity tracking, metrics, and more.
-
Spark is a data procesessing engine, intended for large-scale data processing and ETL.
-
Hadoop is a big data framework for distributed storage and processing.
Couchbase has connectors that support each of these three popular tools.
Finally, Couchbase Analytics is currently in developer preview. It is intended as a data management engine that runs parallel to Couchbase Server. It’s a developer preview, and is not yet recommended to be used in production, but you can download Couchbase Analytics and Kafka, Spark, Hadoop extensions (click the Extensions tab) and try them out.
Summary
We’ve covered data modeling, data migration, and application migration through the lens of SQL Server. This is a good starting point for your next project, and will give you something to think about if you are considering migrating.
The Couchbase Developer Portal contains more details and information about every aspect of Couchbase Server.
I want to hear from you about what Couchbase can do to make your transition easier, whether you’re migrating or starting fresh. Did I miss something? Do you have a tool or system that you recommend? Have questions? Check out the Couchbase Forums, email me at matthew.groves@couchbase.com or find me on Twitter @mgroves.
This is a repost that originally appeared on the Couchbase Blog: New Profiling and Monitoring in Couchbase Server 5.0 Preview.
N1QL query monitoring and profiling updates are just some of goodness you can find in February’s developer preview release of Couchbase Server 5.0.0.
Go download the February 5.0.0 developer release of Couchbase Server today, click the "Developer" tab, and check it out. You still have time to give us some feedback before the official release.
As always, keep in mind that I’m writing this blog post on early builds, and some things may change in minor ways by the time you get the release.
What is profiling and monitoring for?
When I’m writing N1QL queries, I need to be able to understand how well (or how badly) my query (and my cluster) is performing in order to make improvements and diagnose issues.
With this latest developer version of Couchbase Server 5.0, some new tools have been added to your N1QL-writing toolbox.
N1QL Writing Review
First, some review.
There are multiple ways for a developer to execute N1QL queries.
-
Use the SDK of your choice.
-
Use the cbq command line tool.
-
Use the Query Workbench in Couchbase Web Console
-
Use the REST API N1QL endpoints
In this post, I’ll be mainly using Query Workbench.
There are two system catalogs that are already available to you in Couchbase Server 4.5 that I’ll be talking about today.
-
system:active_request - This catalog lists all the currently executing active requests or queries. You can execute the N1QL query
SELECT * FROM system:active_requests;and it will list all those results. -
system:completed_requests - This catalog lists all the recent completed requests (that have run longer than some threshold of time, default of 1 second). You can execute
SELECT * FROM system:completed_requests;and it will list these queries.
New to N1QL: META().plan
Both active_requests and completed_requests return not only the original N1QL query text, but also related information: request time, request id, execution time, scan consistency, and so on. This can be useful information. Here’s an example that looks at a simple query (select * from `travel-sample`) while it’s running by executing select * from system:active_requests;
{
	"active_requests": {
	  "clientContextID": "805f519d-0ffb-4adf-bd19-15238c95900a",
	  "elapsedTime": "645.4333ms",
	  "executionTime": "645.4333ms",
	  "node": "10.0.75.1",
	  "phaseCounts": {
		"fetch": 6672,
		"primaryScan": 7171
	  },
	  "phaseOperators": {
		"fetch": 1,
		"primaryScan": 1
	  },
	  "phaseTimes": {
		"authorize": "500.3µs",
		"fetch": "365.7758ms",
		"parse": "500µs",
		"primaryScan": "107.3891ms"
	  },
	  "requestId": "80787238-f4cb-4d2d-999f-7faff9b081e4",
	  "requestTime": "2017-02-10 09:06:18.3526802 -0500 EST",
	  "scanConsistency": "unbounded",
	  "state": "running",
	  "statement": "select * from `travel-sample`;"
	}
}
First, I want to point out that phaseTimes is a new addition to the results. It’s a quick and dirty way to get a sense of the query cost without looking at the whole profile. It gives you the overall cost of each request phase without going into detail of each operator. In the above example, for instance, you can see that parse took 500µs and primaryScan took 107.3891ms. This might be enough information for you to go on without diving into META().plan.
However, with the new META().plan, you can get very detailed information about the query plan. This time, I’ll execute SELECT *, META().plan FROM system:active_requests;
[
  {
    "active_requests": {
      "clientContextID": "75f0f401-6e87-48ae-bca8-d7f39a6d029f",
      "elapsedTime": "1.4232754s",
      "executionTime": "1.4232754s",
      "node": "10.0.75.1",
      "phaseCounts": {
        "fetch": 12816,
        "primaryScan": 13231
      },
      "phaseOperators": {
        "fetch": 1,
        "primaryScan": 1
      },
      "phaseTimes": {
        "authorize": "998.7µs",
        "fetch": "620.704ms",
        "primaryScan": "48.0042ms"
      },
      "requestId": "42f50724-6893-479a-bac0-98ebb1595380",
      "requestTime": "2017-02-15 14:44:23.8560282 -0500 EST",
      "scanConsistency": "unbounded",
      "state": "running",
      "statement": "select * from `travel-sample`;"
    },
    "plan": {
      "#operator": "Sequence",
      "#stats": {
        "#phaseSwitches": 1,
        "kernTime": "1.4232754s",
        "state": "kernel"
      },
      "~children": [
        {
          "#operator": "Authorize",
          "#stats": {
            "#phaseSwitches": 3,
            "kernTime": "1.4222767s",
            "servTime": "998.7µs",
            "state": "kernel"
          },
          "privileges": {
            "default:travel-sample": 1
          },
          "~child": {
            "#operator": "Sequence",
            "#stats": {
              "#phaseSwitches": 1,
              "kernTime": "1.4222767s",
              "state": "kernel"
            },
            "~children": [
              {
                "#operator": "PrimaryScan",
                "#stats": {
                  "#itemsOut": 13329,
                  "#phaseSwitches": 53319,
                  "execTime": "26.0024ms",
                  "kernTime": "1.3742725s",
                  "servTime": "22.0018ms",
                  "state": "kernel"
                },
                "index": "def_primary",
                "keyspace": "travel-sample",
                "namespace": "default",
                "using": "gsi"
              },
              {
                "#operator": "Fetch",
                "#stats": {
                  "#itemsIn": 12817,
                  "#itemsOut": 12304,
                  "#phaseSwitches": 50293,
                  "execTime": "18.5117ms",
                  "kernTime": "787.9722ms",
                  "servTime": "615.7928ms",
                  "state": "services"
                },
                "keyspace": "travel-sample",
                "namespace": "default"
              },
              {
                "#operator": "Sequence",
                "#stats": {
                  "#phaseSwitches": 1,
                  "kernTime": "1.4222767s",
                  "state": "kernel"
                },
                "~children": [
                  {
                    "#operator": "InitialProject",
                    "#stats": {
                      "#itemsIn": 11849,
                      "#itemsOut": 11848,
                      "#phaseSwitches": 47395,
                      "execTime": "5.4964ms",
                      "kernTime": "1.4167803s",
                      "state": "kernel"
                    },
                    "result_terms": [
                      {
                        "expr": "self",
                        "star": true
                      }
                    ]
                  },
                  {
                    "#operator": "FinalProject",
                    "#stats": {
                      "#itemsIn": 11336,
                      "#itemsOut": 11335,
                      "#phaseSwitches": 45343,
                      "execTime": "6.5002ms",
                      "kernTime": "1.4157765s",
                      "state": "kernel"
                    }
                  }
                ]
              }
            ]
          }
        },
        {
          "#operator": "Stream",
          "#stats": {
            "#itemsIn": 10824,
            "#itemsOut": 10823,
            "#phaseSwitches": 21649,
            "kernTime": "1.4232754s",
            "state": "kernel"
          }
        }
      ]
    }
  }, ...
]
The above output comes from the Query Workbench.
Note the new "plan" part. It contains a tree of operators that combine to execute the N1QL query. The root operator is a Sequence, which itself has a collection of child operators like Authorize, PrimaryScan, Fetch, and possibly even more Sequences.
Enabling the profile feature
To get this information when using cbq or the REST API, you’ll need to turn on the "profile" feature.
You can do this in cbq by entering set -profile timings; and then running your query.
You can also do this with the REST API on a per request basis (using the /query/service endpoint and passing a querystring parameter of profile=timings, for instance).
You can turn on the setting for the entire node by making a POST request to http://localhost:8093/admin/settings, using Basic authentication, and a JSON body like:
{
  "completed-limit": 4000,
  "completed-threshold": 1000,
  "controls": false,
  "cpuprofile": "",
  "debug": false,
  "keep-alive-length": 16384,
  "loglevel": "INFO",
  "max-parallelism": 1,
  "memprofile": "",
  "pipeline-batch": 16,
  "pipeline-cap": 512,
  "pretty": true,
  "profile": "timings",
  "request-size-cap": 67108864,
  "scan-cap": 0,
  "servicers": 32,
  "timeout": 0
}
Notice the profile setting. It was previously set to off, but I set it to "timings".
You may not want to do that, especially on nodes being used by other people and programs, because it will affect other queries running on the node. It’s better to do this on a per-request basis.
It’s also what Query Workbench does by default.
Using the Query Workbench
There’s a lot of information in META().plan about how the plan is executed. Personally, I prefer to look at a simplified graphical version of it in Query Workbench by clicking the "Plan" icon (which I briefly mentioned in a previous post about the new Couchbase Web Console UI).

Let’s look at a slightly more complex example. For this exercise, I’m using the travel-sample bucket, but I have removed one of the indexes (DROP INDEX `travel-sample.def_sourceairport;`).
I then execute a N1QL query to find flights between San Francisco and Miami:
SELECT r.id, a.name, s.flight, s.utc, r.sourceairport, r.destinationairport, r.equipment
FROM `travel-sample` r
UNNEST r.schedule s
JOIN `travel-sample` a ON KEYS r.airlineid
WHERE r.sourceairport = 'SFO'
AND r.destinationairport = 'MIA'
AND s.day = 0
ORDER BY a.name;
Executing this query (on my single-node local machine) takes about 10 seconds. That’s definitely not an acceptible amount of time, so let’s look at the plan to see what the problem might be (I broke it into two lines so the screenshots will fit in the blog post).

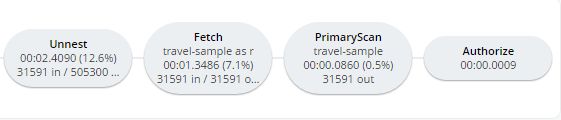
Looking at that plan, it seems like the costliest parts of the query are the Filter and the Join. JOIN operations work on keys, so they should normally be very quick. But it looks like there are a lot of documents being joined.
The Filter (the WHERE part of the query) is also taking a lot of time. It’s looking at the sourceairport and destinationairport fields. Looking elsewhere in the plan, I see that there is a PrimaryScan. This should be a red flag when you are trying to write performant queries. PrimaryScan means that the query couldn’t find an index other than the primary index. This is roughly the equivalent of a "table scan" in relational database terms. (You may want to drop the primary index so that these issues get bubbled-up faster, but that’s a topic for another time).
Let’s add an index on the sourceairport field and see if that helps.
CREATE INDEX `def_sourceairport` ON `travel-sample`(`sourceairport`);Now, running the same query as above, I get the following plan:

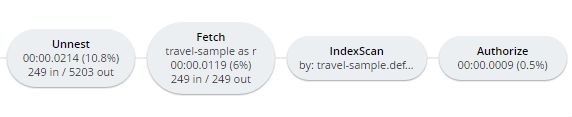
This query took ~100ms (on my single-node local machine) which is much more acceptible. The Filter and the Join still take up a large percentage of the time, but thanks to the IndexScan replacing the PrimaryScan, there are many fewer documents that those operators have to deal with. Perhaps the query could be improved even more with an additional index on the destinationairport field.
Beyond Tweaking Queries
The answer to performance problems is not always in tweaking queries. Sometimes you might need to add more nodes to your cluster to address the underlying problem.
Look at the PrimaryScan information in META().plan. Here’s a snippet:
"~children": [
  {
    "#operator": "PrimaryScan",
    "#stats": {
      "#itemsOut": 13329,
      "#phaseSwitches": 53319,
      "execTime": "26.0024ms",
      "kernTime": "1.3742725s",
      "servTime": "22.0018ms",
      "state": "kernel"
    },
    "index": "def_primary",
    "keyspace": "travel-sample",
    "namespace": "default",
    "using": "gsi"
  }, ... ]
The servTime value indicates how much time is spent by the Query service to wait on the Key/Value data storage. If the servTime is very high, but there is a small number of documents being processed, that indicates that the indexer (or the key/value service) can’t keep up. Perhaps they have too much load coming from somewhere else. So this means that something weird is running someplace else or that your cluster is trying to handle too much load. Might be time to add some more nodes.
Similarly, the kernTime is how much time is spent waiting on other N1QL routines. This might mean that something else downstream in the query plan has a problem, or that the query node is overrun with requests and are having to wait a lot.
We want your feedback!
The new META().plan functionality and the new Plan UI combine in Couchbase Server 5.0 to improve the N1QL writing and profiling process.
Stay tuned to the Couchbase Blog for information about what’s coming in the next developer build.
Interested in trying out some of these new features? Download Couchbase Server 5.0 today!
We want feedback! Developer releases are coming every month, so you have a chance to make a difference in what we are building.
Bugs: If you find a bug (something that is broken or doesn’t work how you’d expect), please file an issue in our JIRA system at issues.couchbase.com or submit a question on the Couchbase Forums. Or, contact me with a description of the issue. I would be happy to help you or submit the bug for you (my Couchbase handlers high-five me every time I submit a good bug).
Feedback: Let me know what you think. Something you don’t like? Something you really like? Something missing? Now you can give feedback directly from within the Couchbase Web Console. Look for the ![]() icon at the bottom right of the screen.
icon at the bottom right of the screen.
In some cases, it may be tricky to decide if your feedback is a bug or a suggestion. Use your best judgement, or again, feel free to contact me for help. I want to hear from you. The best way to contact me is either Twitter @mgroves or email me matthew.groves@couchbase.com.
This is a repost that originally appeared on the Couchbase Blog: Couchbase Server 4.6 Supports Windows 10 Anniversary Update.
Back in August 2016, when the Windows 10 Anniversary Update was rolling out, I blogged that Couchbase Server was not working correctly on it. That is no longer true!
Short version: Couchbase Server 4.6 now supports Windows 10 Anniversary Update. Go download and try it out today.
The longer story is that this issue was addressed in the 4.5.1 release. The fix was somewhat experimental, and the anniversary update was still in the process of being rolled out. So there were two releases of Couchbase Server 4.5.1 for Windows:
- Normal windows release (works with Windows 10, Windows Server, etc but not Anniversary Update)
- Windows 10 Anniversary Edition Developer Preview (DP) release
Furthermore, Couchbase Server 4.6 has had a Developer Preview release of its own for a while, and that release also works with the anniversary update.
But now everything is official.
- Couchbase Server 4.6 has been released
- Couchbase Server 4.6 officially supports Windows 10 Anniversary Update
Got questions? Got comments? Check out our documentation on the Couchbase Developer Portal, post a question on the Couchbase Forums, leave a comment here, or ping me on Twitter.
