curl -XPUT -H "Content-Type: application/json" http://localhost:8094/api/index/medical-condition -d '{ ... json payload ...}'Posts tagged with 'c'
Eric Elliott is increasing code quality by leveraging pure functions and fast feedback.
Editors note: sorry for the audio quality; I had to use the Skype audio recording, and it's not as good as I'd like. But it's too good of an episode to just throw out!
Show Notes:
- I mentioned Episode 056: Jeremy Clark on Convincing Your Boss on Unit Testing
- The Outrageous Cost of Skipping TDD and Code Reviews
- Five Questions Every Unit Test Must Answer
- JavaScript Testing: Unit vs Functional vs Integration Tests
- TDD the RITE Way
- How to Build a High Velocity Development Team
- Tools mentioned:
- DevAnywhere - online mentorship
Eric Elliott is on Twitter. Special thanks to JS Cheerleader, who set up this interview!
Want to be on the next episode? You can! All you need is the willingness to talk about something technical.
Theme music is "Crosscutting Concerns" by The Dirty Truckers, check out their music on Amazon or iTunes.
Full month of podcasts with some AMAZING guests coming up in October. After that, I think I'll wrap for the year (with the exception of a special episode that I'm planning).
But, if you want to get on the show next year, please contact me!
Subscribe now!
Here's what's coming in October:
- Eric Elliott on the benefits of TDD
- Ted Neward on the actor model with Akka
- Ted Neward (again) on (JavaScript) Transpilers, web assembly, and general alternatives to writing JS
- Patrick Smacchia on NDepend, refactoring
- Sam Nasr on the benefits of user group involvement
Subscribe now with your podcatcher of choice!
Want to be on the next episode? You can! All you need is the willingness to talk about something technical.
This is a repost that originally appeared on the Couchbase Blog: Powershell with the Couchbase REST API.
PowerShell is a scripting environment / command line that comes with Windows and is also available for Linux and within Azure.
Maybe you’ve used Postman or Fiddler to make HTTP requests. Those are great, but not necessarily the right tools for automation or scripting.
You may have heard of curl before. It’s a command line tool for making HTTP requests.
If you’re a .NET/Windows developer (like me), maybe you aren’t familiar with curl. I use PowerShell as my default command line every day (though I still consider myself a PowerShell neophyte). In this post, I’ll show you how you can use PowerShell’s Invoke-WebRequest to make HTTP requests (which you can use within PowerShell scripts for automation).
You can check out the PowerShell script I created on GitHub. Note: as of the time of writing this post, I’m using PowerShell 5.1 on Windows 10.
Couchbase REST API
Couchbase Server has a an extensive REST API that you can use to manage and administrate just about every aspect of Couchbase Server. For this blog post, I’m going to focus on the Full Text Search (FTS) API. I’m going to show this because:
-
Creating an FTS index is something you’ll eventually want to automate
-
You will probably want to share an FTS index you created with your team and/or check it into source control
-
Couchbase Console already shows you exactly how to do it with curl.
I’m not going to cover FTS in detail: I invite you to check out past blog posts on FTS, and this short video demonstrating full text search.
Full Text Search review
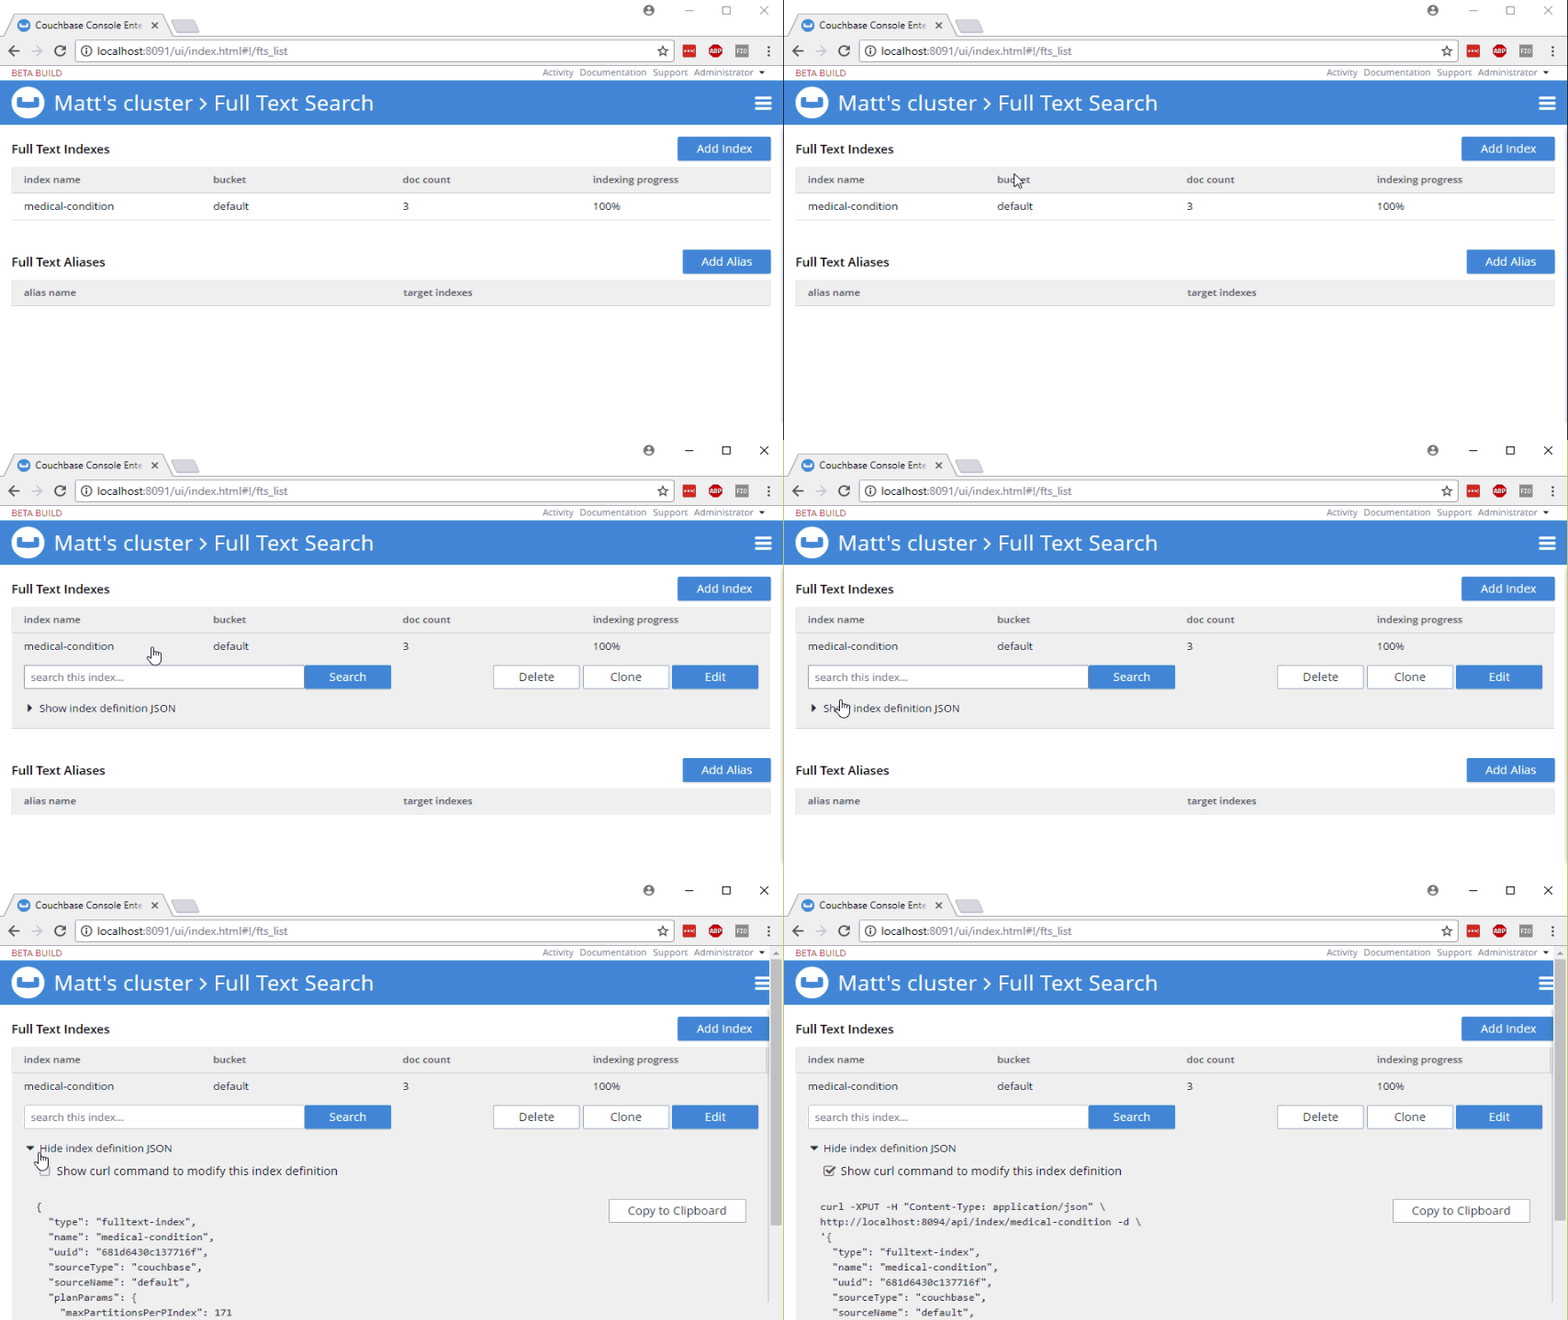
When you initially create an FTS index, you will probably use the built-in FTS UI in the Couchbase Console. This is fine when you are doing the initial development, but it’s not practical if you want to share this index with your team, automate deployment, or take advantage of source control.
Fortunately, you can use the "Show index definition JSON" feature to see the JSON data that makes up the index definition. You can also have Couchbase Console generate the curl method for you.

Well, if you’re using curl, that’s very convenient. Here’s an example:
You can copy/paste that into a script, and check the script into source control. But what if you don’t use curl?
PowerShell version: Invoke-WebRequest
First, create a new PowerShell script. I called mine createFtsIndex.ps1. All this PowerShell script is going to do is create an FTS index on an existing bucket.
You can start by pasting the "curl" command into this file. The bulk of this command is the JSON definition, which will be exactly the same.
Let’s breakdown the rest of the curl command to see what’s happening:
-
-XPUT- This is telling curl to use the PUT verb with the HTTP request -
-H "Content-Type: application/json"- Use a Content-Type header. -
http://localhost:8094/api/index/medical-condition- This is the URL of the REST endpoint. The "localhost" will vary based on where Couchbase is running, and the "medical-condition" part is just the name of the FTS index. -
-d '…json payload…'- The body of content that will be included in the HTTP request.
PowerShell’s Invoke-WebRequest can do all this stuff too, but the syntax is a bit different. Let’s step through the equivalents:
-
-Method PUT- This is telling Invoke-WebRequest to use the PUT verb with the HTTP request, so you can replace-XPUT -
-Header @{ … }- Specify headers to use with the request (more on this later) -
-Uri http://localhost:8094/api/index/medical-condition"- You just need to add "-Uri" in front -
-Body '…json payload…'- The body of content is included this way instead of using curl’s-d
Headers
PowerShell expects a "dictionary" that contains headers. The syntax for a literal dictionary in PowerShell is:
@{"key1"="value1"; "key2"="value2"}
So then, to specify Content-Type:
-Headers @{"Content-Type"="application/json"}
One thing that the curl output did not generate is the authentication information that you need to make a request to the API. With curl, you can specify basic authentication by adding the username/password to the URL. It will then translate it into the appropriate Basic Auth headers.
With PowerShell, it appears you have to do that yourself. My local Couchbase Server has credentials "Administrator" and "password" (please don’t use those in production). Those need to be encoded into Base64 and added to the headers.
Then the full Headers dictionary looks like this:
-Headers @{"Authorization" = "Basic "+[System.Convert]::ToBase64String([System.Text.Encoding]::UTF8.GetBytes("Administrator:password")); "Content-Type"="application/json"}
You might think that’s a bit noisy, and I agree. If you know a cleaner way to do this, I’m dying to know. Please leave a comment.
Execute the PowerShell script
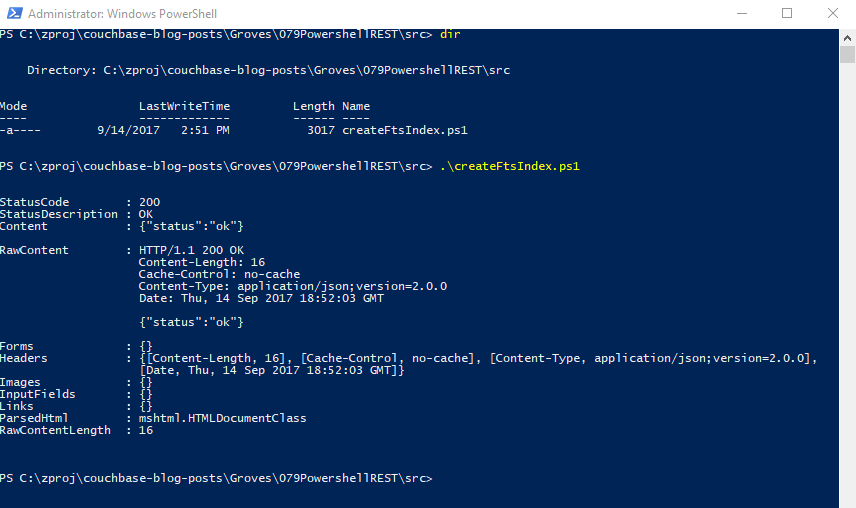
To execute the script, simply type .\createFtsIndex.ps1 at the PowerShell command line.

You’re now ready to make this a part of your deployment.
Summary
PowerShell is a handy tool for scripting and automation. It’s used by Azure, Octopus Deploy, and anywhere Windows is running. Use PowerShell to automate Couchbase REST API calls for things like Full Text Search indexes, and your team will thank you.
Need help? Reach out to me with questions by leaving a comment below or finding me on Twitter @mgroves.
Dean Hume is building Progressive Web Apps (PWAs).
Show Notes:
- Book: Fast ASP.NET Websites by Dean Hume
- Book: Progressive Web Apps by Dean Hume (currently in early access preview)
- Betting on the Web: Starbucks PWA
- Node.js / Express.js
- HTTPS / HTTP2
- Workbox.js - framework to store your website’s files locally on your user devices
- Chrome Progressive Web Apps
- Visual Studio Code
- Google Developers Website
- Mozilla Developer Portal
- Aaron Gustafson (blog post on A List Apart)
- Dean Hume's website
- Google web team members
Want to be on the next episode? You can! All you need is the willingness to talk about something technical.
Theme music is "Crosscutting Concerns" by The Dirty Truckers, check out their music on Amazon or iTunes.
This is a repost that originally appeared on the Couchbase Blog: Dependency Injection with ASP.NET Core and Couchbase.
Dependency Injection is a design pattern that makes coding easier. It saves you the hassle of instantiating objects with complex dependencies, and it makes it easier for you to write tests. With the Couchbase.Extensions.DependencyInjection library (GitHub), you can use Couchbase clusters and buckets within the ASP.NET Core dependency injection framework.
In my last blog post on distributed caching with ASP.NET, I mentioned the DependencyInjection library. Dependency injection will be explored in-depth in this post. Feel free to follow along with the code samples I’ve created, available on GitHub.
Basic setup of Couchbase
First, you’ll need a Couchbase Server cluster running. You can:
-
Install it on-premise
-
Run in a container with Docker
-
Use a cloud service like Azure
Next, you’ll need to create a bucket in Couchbase. This can be the "travel-sample" bucket that comes with Couchbase, or a bucket that you create yourself.
If you are using Couchbase Server 5.0, you’ll also need to create a user. Give that user Cluster Admin permission, and give it the same name as the bucket, just to keep things simple if you are following along.
Dependency Injection with Couchbase.Extensions
The Couchbase.Extensions (GitHub) project aims to make working with Couchbase Server and ASP.NET Core simpler. Dependency Injection is just one of these extensions.
You can add it to your ASP.NET Core project with NuGet:
-
By using Package Manager:
Install-Package Couchbase.Extensions.DependencyInjection -Version 1.0.2 -
With the NuGet UI
-
Use the .NET command line:
dotnet add package Couchbase.Extensions.DependencyInjection --version 1.0.2
(Version 1.0.2 is the latest version at the time of writing).

Next, you’ll need to make changes to your Startup class in Startup.cs.
In the blog post on caching, I hard-coded the configuration:
services.AddCouchbase(client =>
{
    client.Servers = new List<Uri> { new Uri("http://localhost:8091")};
    client.UseSsl = false;
});
This is fine for demos and blog posts, but you’ll likely want to use a configuration file for a production project.
services.AddCouchbase(Configuration.GetSection("Couchbase"));Assuming you’re using the default appsettings.json, update that file to add a Couchbase section:
"Couchbase" : {
  "Servers": [
    "http://localhost:8091"
  ],
  "UseSsl": false
}
By making a "Couchbase" section, the dependency injection module will read right from the appsettings.json text file.
Constructor Injection
After dependency injection is setup, you can start injecting useful objects into your classes. You might inject them into Controllers, services, or repositories.
Here’s an example of injecting into HomeController:
public class HomeController : Controller
{
    private readonly IBucket _bucket;

    public HomeController(IBucketProvider bucketProvider)
    {
        _bucket = bucketProvider.GetBucket("travel-sample", "password");
    }

    // ... snip ...
}
Next, let’s do a simple Get operation on a well-known document in "travel-sample". This token usage of the Couchbase .NET SDK will show dependency injection in action. I’ll make a change to the generated About action method. In that method, it will retrieve a route document and write out the equipment number.
public IActionResult About()
{
    // get the route document for Columbus to Chicago (United)
    var route = _bucket.Get<dynamic>("route_56027").Value;

    // display the equipment number of the route
    ViewData["Message"] = "CMH to ORD - " + route.equipment;

    return View();
}
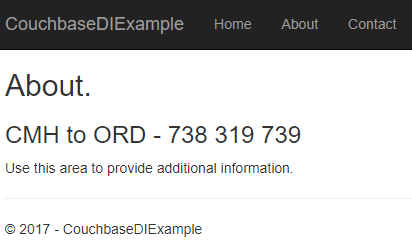
And the result is:

Success! Dependency injection worked, and we’re ready to use a Couchbase bucket.
If you aren’t using "travel-sample", use a key from your own bucket.
Named buckets
You can use dependency injection for a single bucket instead of having to specify the name each time.
Start by creating an interface that implements INamedBucketProvider. Leave it empty. Here’s an example:
public interface ITravelSampleBucketProvider : INamedBucketProvider
{
    // nothing goes in here!
}
Then, back in Startup.cs, map this interface to a bucket using AddCouchbaseBucket:
services
    .AddCouchbase(Configuration.GetSection("Couchbase"))
    .AddCouchbaseBucket<ITravelSampleBucketProvider>("travel-sample", "password");
Now, the ITravelSampleBucketProvider gets injected instead of the more general provider.
public HomeController(ITravelSampleBucketProvider travelBucketProvider)
{
    _bucket = travelBucketProvider.GetBucket();
}
More complex dependency injection
Until this point, we’ve only used dependency injection on Controllers. Dependency injection starts to pay dividends with more complex, deeper object graphs.
As an example, imagine a service class that uses a Couchbase bucket, but also uses an email service.
public class ComplexService : IComplexService
{
    private readonly IBucket _bucket;
    private readonly IEmailService _email;

    public ComplexService(ITravelSampleBucketProvider bucketProvider, IEmailService emailService)
    {
        _bucket = bucketProvider.GetBucket();
        _email = emailService;
    }

    public void ApproveApplication(string emailAddress)
    {
        _bucket.Upsert(emailAddress, new {emailAddress, approved = true});
        _email.SendEmail(emailAddress, "Approved", "Your application has been approved!");
    }
}
Next, let’s use this service in a controller (aka making it a dependency). But notice that the controller is not directly using either the bucket or the email service.
public class ApproveController : Controller
{
    private readonly IComplexService _svc;

    public ApproveController(IComplexService svc)
    {
        _svc = svc;
    }

    public IActionResult Index()
    {
        var fakeEmailAddress = Faker.Internet.Email();
        _svc.ApproveApplication(fakeEmailAddress);
        ViewData["Message"] = "Approved '" + fakeEmailAddress + "'";
        return View();
    }
}
If I were to instantiate ComplexService manually, I would have to instantiate at least two other objects. It would look something like: new ComplexService(new BucketProvider(), new MyEmailService(). That’s a lot that I have to keep track of, and if any dependencies change, it’s a lot of manual maintenance.
Instead, I can have ASP.NET Core use dependency injection to do all this for me. Back in Startup:
services.AddTransient<IEmailService, MyEmailService>();
services.AddTransient<IComplexService, ComplexService>();
Now, ASP.NET Core knows how to instantiate:
-
ITravelSampleBucketProvider, thanks to Couchbase.Extensions.DependencyInjection -
IEmailService- I told it to useMyEmailService -
IComplexService- I told it to useComplexService
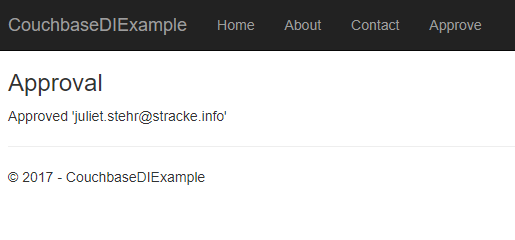
Finally, when ApproveController is instantiated, ASP.NET Core will know how to do it. It will create ComplexService by instantiating MyEmailService and ComplexService. It will inject ComplexService automatically into `ApproveController’s constructor. The end result:

For the complete example, be sure to check out the source code that accompanies this blog post on GitHub.
Cleaning up
Don’t forget to clean up after yourself. When the ASP.NET Core application is stops, release any resources that the Couchbase .NET SDK is using. In the Configure method in Startup, add a parameter of type IApplicationLifetime:
public void Configure(IApplicationBuilder app, IHostingEnvironment env, ILoggerFactory loggerFactory, IApplicationLifetime applicationLifetime)Within that Configure method, setup an ApplicationStopped event:
applicationLifetime.ApplicationStopped.Register(() =>
{
    app.ApplicationServices.GetRequiredService<ICouchbaseLifetimeService>().Close();
});
Summary
Dependency injection is a rich subject. Entire books have been written about it and its benefits to your application. This blog post just scratched the surface and didn’t even cover the testability benefits.
Couchbase.Extensions.DependencyInjection makes it easier to inject Couchbase into ASP.NET Core.
If you have questions or comments, make sure to check out the GitHub repository or the Couchbase .NET SDK forums.
And please reach out to me with questions by leaving a comment below or finding me on Twitter @mgroves.


