private static readonly Lazy<IBucket> Bucket = new Lazy<IBucket>(() =>
{
    var uri = ConfigurationManager.AppSettings["couchbaseUri"];
    var bucketName = ConfigurationManager.AppSettings["couchbaseBucketName"];
    var bucketPassword = ConfigurationManager.AppSettings["couchbaseBucketPassword"];
    var cluster = new Cluster(new ClientConfiguration
    {
        Servers = new List<Uri> { new Uri(uri) }
    });
    return cluster.OpenBucket(bucketName, bucketPassword);
});Posts tagged with 'visual studio'
Calvin Allen talks with me on a variety of topics. This episode is sponsored by Smartsheet.
Show Notes:
-
I think Calvin may have done some rebranding since we recorded. Check out CalvinAllen83 on Twitch.
-
Streaming services mentioned: Mixer, YouTube, and Twitch.
-
restream.io, which I’m now using for…
-
Couchbase Coding with Matt Groves, a show where I’m streaming daily.
-
Jeff Fritz’s live stream: Fritz and Friends
-
Visual Studio extensions by Mads Kristensen
-
Calvin’s Open in Notepad++ extension (GitHub), Couchbase extension on GitHub
-
I used the term MVP in this episode to mean Minimum Viable Product
-
SSL Labs rating
Want to be on the next episode? You can! All you need is the willingness to talk about something technical.
Music is by Joe Ferg, check out more music on JoeFerg.com!
This is a repost that originally appeared on the Couchbase Blog: Azure Functions and Lazy Initialization with Couchbase Server.
Azure Functions are still new to me, and I’m learning as I’m going. I blogged about my foray into Azure Functions with Couchbase over a month ago. Right after I posted that, I got some helpful feedback about the way I was instantiating a Couchbase cluster (and bucket).
I had (wrongly) assumed that there was no way to save state between Azure Function calls. This is why I created a GetCluster() method that was called each time the function ran. But, initializing a Couchbase Cluster object is an expensive operation. The less often you instantiate it, the better.
You can follow along with the updated source code for this blog post on Github.
Static state
I had a hard time finding documentation on whether I could use a static object for reuse between function calls. I suppose I should have experimented, like fellow Microsoft MVP Mark Heath did. Instead, I posed the question to StackOverflow.
In short: yes. A Cluster, instantiated and saved to a static member, can is reusable between function calls. According to Mark’s post above, there’s no guarantee how long this value will survive. But that’s an expected trade-off that you make when going "serverless".
Lazy initializing within Azure Functions
Simply using a static member would work, but it’s not thread-safe. There are a few ways to tackle that issue, but an easy way that’s built right into the .NET framework is to use Lazy Initialization with Lazy<T>.
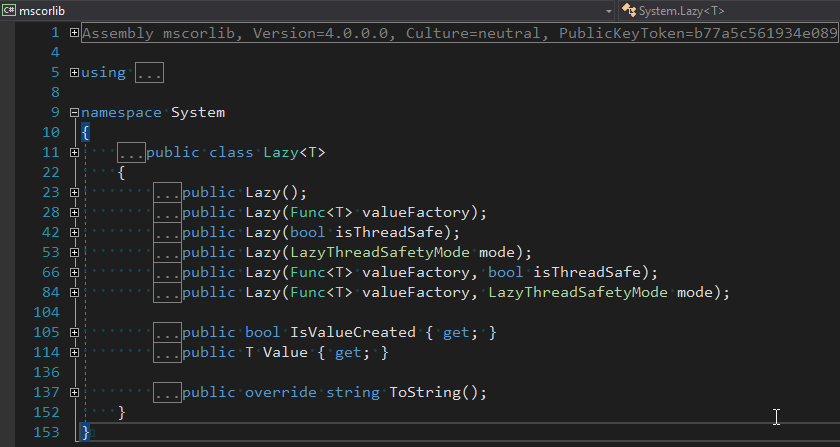
First, I removed the GetBucket and GetCluster methods. Next, I created a Lazy<IBucket> property to replace them.
I just made a single property for a bucket, since that’s all I need for this example. But if you need to use the cluster, you can easily make that its own Lazy property. (Once you have a cluster, getting a bucket is a relatively cheap operation).
Using a Lazy property
When you instantiate a Lazy<T> object, you supply it with an initialization lambda. That lambda won’t execute until the Value property is actually called for the first time.
var lazyObject = new Lazy<string>(() =>
{
    // this code won't be called until 'lazyObject.Value' is referenced
    // for the first time
    return "I'm lazy!";
});
For instance, notice the Value between Bucket and GetAsync in the updated version of my Azure Functions:
var doc = await Bucket.Value.GetAsync<MyDocument>(id);If that’s the first time Value is used, the cluster will be initialized. Otherwise, it will use the already initialized cluster (try experimenting with a Guid instead of a Bucket).
Summary
State can be saved between Azure Function calls by using a static member. Make sure that it’s thread-safe (by using Lazy<T> or something like it). Don’t make any assumptions about how long that object will be around.
Anything else I missed? Are you using Azure Functions with Couchbase? I would love to hear from you. Please leave a comment below or ping me on Twitter @mgroves.
This is a repost that originally appeared on the Couchbase Blog: Azure Functions with Couchbase Server.
Azure Functions are Microsoft’s answer to Amazon’s Lambdas or Google’s Cloud Functions (aka "serverless" architecture). They give you a way to deploy small pieces of code, and let Azure handle the underlying server. I’ve never used them before, so I thought I would give them a try beyond "Hello, World", by getting them to work with Couchbase Server.
There are more options in Azure Functions beyond simple HTTP events (e.g. Blob triggers, GitHub webhooks, Azure Storage queue triggers, etc). But, for this blog post, I’m going to focus on just HTTP events. I’ll create simple "Get" and "Set" endpoints that interact with Couchbase Server.
Before beginning, you can follow along by getting the source code for this blog post on GitHub.
Also, please read the Azure Functions and Lazy Initialization with Couchbase Server post. It contains an important update about using Couchbase Server and Azure Functions.
Getting setup to develop Azure Functions
For this blog post, I decided to try Visual Studio Preview.
I did this because there is a handy tool for creating Azure Function projects in Visual Studio.

But it only works for the preview version at this time. You don’t have to use these tools to develop Azure Functions, but it made the process simpler for me.
Once I had this tooling in place, all I had to was to File→New→Project. Then under "Cloud", select "Azure Functions".

Once you do this, you’ll have an empty looking project with a couple of JSON files. Right click on the project, add item, and select "Azure Function".

Next, you’ll need to select what kind of Azure Function you want to create. I chose "HttpTrigger". I also chose "Anonymous" to keep this post simple, but depending on your use case, you may want to require an authentication token. After you do this, a very simple shell of a function will be generated (as a C# class). You can execute this function locally (indeed, that is what the local.settings.json file is for) so you can test it out without deploying to Azure yet.
Writing a "Get" function
First, I decided that I wanted two Azure Functions: one to "get" a piece of data by ID, and one to "set" a new piece of given data. I started by defining the shape of my data with a simple C# POCO:
public class MyDocument
{
    public string Name { get; set; }
    public int ShoeSize { get; set; }
    public decimal Balance { get; set; }
}
Here is the Azure function that I wrote to "get" that document from Couchbase Server:
public static async Task<HttpResponseMessage> Get([HttpTrigger(AuthorizationLevel.Anonymous, "get", Route = null)]HttpRequestMessage req, TraceWriter log)
{
    // parse query parameter
    var id = req.GetQueryNameValuePairs()
        .FirstOrDefault(q => string.Compare(q.Key, "id", true) == 0)
        .Value;

    using (var cluster = GetCluster())
    {
        using (var bucket = GetBucket(cluster))
        {
            var doc = await bucket.GetAsync<MyDocument>(id);
            return req.CreateResponse(HttpStatusCode.OK, doc.Value, new JsonMediaTypeFormatter());
        }
    }
}
Some things to note:
-
I remove the
"post"that was generated by the tooling, since I want this to only be a"get"function. -
Parsing the query parameter seems like a lot of extra code for this simple case. You can alternatively create a "function with parameters"
-
GetClusterandGetBucketwill be discussed later in this post. But the short story is that I want this code to work both locally and deployed to Azure
Next, run this function locally, and you’ll get a console screen that looks similar to this:
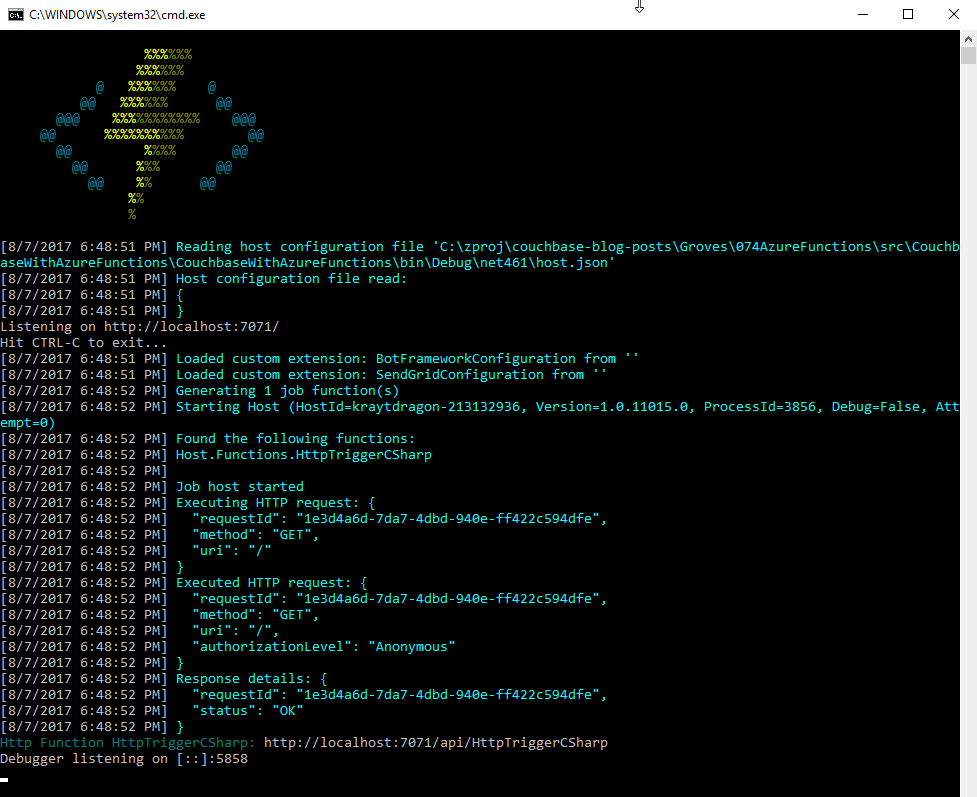
At the bottom, you’ll notice that it tells you the Azure Function URL(s). Assuming I had a document in Couchbase (I don’t yet), I could create an HTTP request with a tool like Postman to: http://localhost:7071/api/HttpTriggerCsharpGet?id=123456
Currently, if I do that, I’ll get "null" as a response (since I don’t have any validation or error checking code). So let’s move on and create a "Set" function.
Writing a "Set" function
The "Set" function will be slightly different. I want document information POSTed to it, and I want it to return a message like "New document inserted with ID 123456".
public static async Task<HttpResponseMessage> Set([HttpTrigger(AuthorizationLevel.Anonymous, "post", Route = null)] MyDocument req, TraceWriter log)
{

    var id = Guid.NewGuid().ToString();

    using (var cluster = GetCluster())
    {
        using (var bucket = GetBucket(cluster))
        {
            await bucket.InsertAsync(id, req);
        }
    }

    return new HttpResponseMessage
    {
        Content = new StringContent($"New document inserted with ID {id}"),
        StatusCode = HttpStatusCode.OK
    };
}
This function has a similar shape to the Get, but some important things to note:
-
There is only
"post"in the HttpTrigger attribute. -
Instead of
HttpRequestMessageas the first parameter, I’ve decided to useMyDocument, and let Azure Functions do the binding for me. -
Since I don’t have
HttpRequestMessage, I can’t call itsCreateResponsemethod, so instead I instantiate a newHttpResponseMessagedirectly to return the success message at the end.
To create a request in Postman, I’ll use a URL of http://localhost:7071/api/HttpTriggerCsharpSet. In the headers, I’ll set Content-Type to "application/json". Finally, the body will be JSON:
{
    "Name": "matthew",
    "Balance": 107.18,
    "ShoeSize": 14
}
Now, when I POST that to the endpoint, I’ll get a response message of "New document inserted with ID f05ea97e-7c2f-4f88-b72d-19756f6a6f35".
Connecting to Couchbase Server
I have glossed over how these functions connect to Couchbase Server.
Previously, I mentioned two methods, GetCluster and GetBucket that will connect to the cluster and bucket, respectively.
private static Cluster GetCluster()
{
    var uri = ConfigurationManager.AppSettings["couchbaseUri"];
    return new Cluster(new ClientConfiguration
    {
        Servers = new List<Uri> { new Uri(uri) }
    });
}

private static IBucket GetBucket(Cluster cluster)
{
    var bucketName = ConfigurationManager.AppSettings["couchbaseBucketName"];
    var bucketPassword = ConfigurationManager.AppSettings["couchbaseBucketPassword"];

    return cluster.OpenBucket(bucketName, bucketPassword);
}
At this point, most of this code should be familiar if you’ve used Couchbase Server and the Couchbase .NET SDK before. I’m connecting to a single node cluster, and then connecting a bucket that has a password set (I’m using Couchbase Server 4.6).
But, the important thing to point out here is the use of Configuration.AppSettings. In the local.settings.json file, I’ve added these Couchbase settings to the Value section:
{
  "IsEncrypted": false,
  "Values": {
    "AzureWebJobsStorage": "",
    "AzureWebJobsDashboard": "",
    "couchbaseUri": "http://localhost:8091",
    "couchbaseBucketName": "azurefunctions",
    "couchbaseBucketPassword": "Password88!"
  }
}
When running Azure Functions locally, this file is used for configuration. I have Couchbase Server running locally with a bucket called "azurefunctions". Anything in "Values" can be accessed via Configuration.AppSettings.
Deploying to Azure
Before deploying the Azure Functions, I’ll need to create a Couchbase Cluster on Azure. This is very easy to do, thanks to Ben Lackey’s great work on the Azure Marketplace. Once that’s deployed, deploying the Azure Functions are also easy, thanks to Visual Studio.
Deploying Couchbase Server to Azure
Here is a short video walking you through the process of creating a Couchbase Server cluster on Azure.
For my example, I followed that video closely. Here is step 1, where I configure the username, password, and resource group.
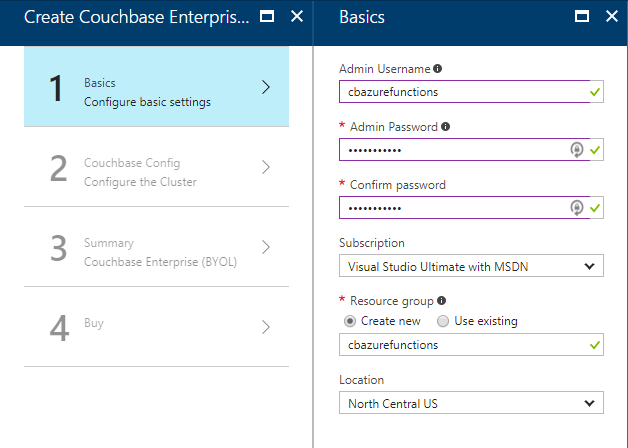
For the second step, I only created a single node cluster on the smallest, cheapest VM (DS1 v2). I created 0 Sync Gateway nodes, since I’m not using Sync Gateway for this example.
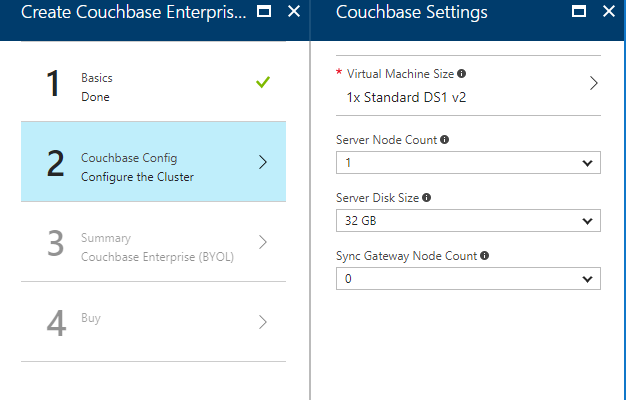
Step 3 is just a summary, and step 4 is a confirmation. It will take 3-5 minutes for the Couchbase Cluster to start up in Azure.
Once the cluster is created, find the URL for the first node in the cluster (just as demonstrated in the above video). My URL looked something like: http://vm0.server-hsmkrefstzg2t.northcentralus.cloudapp.azure.com:8091. Go to this URL, login, and create a bucket (I called mine "azurefunctions", just like I did locally).
Deploying Azure Functions to Azure
Now, Couchbase Server is running. So let’s deploy the Azure Functions that will interact with it.
To begin, right-click the project in Visual Studio and select "publish". You’ll need to create a new publish profile the first time you do this, but that’s easy.
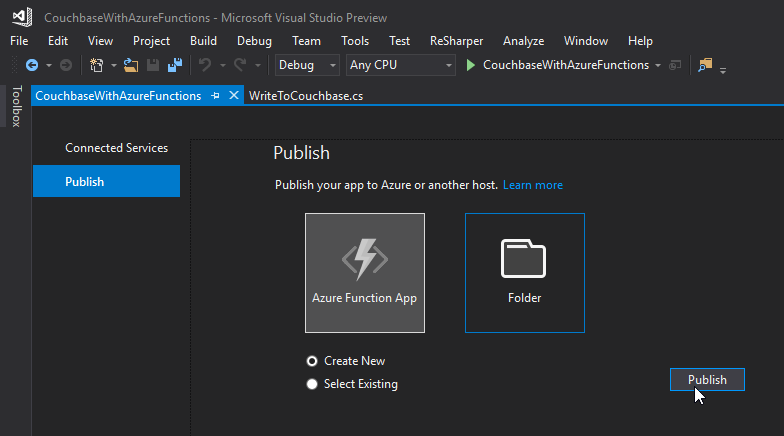
Give your functions an app name, select a subscription, select a resource group (you can create a new one, or use the same group that you created above for Couchbase), select a service plan, and finally a storage account. You can create new ones when necessary.
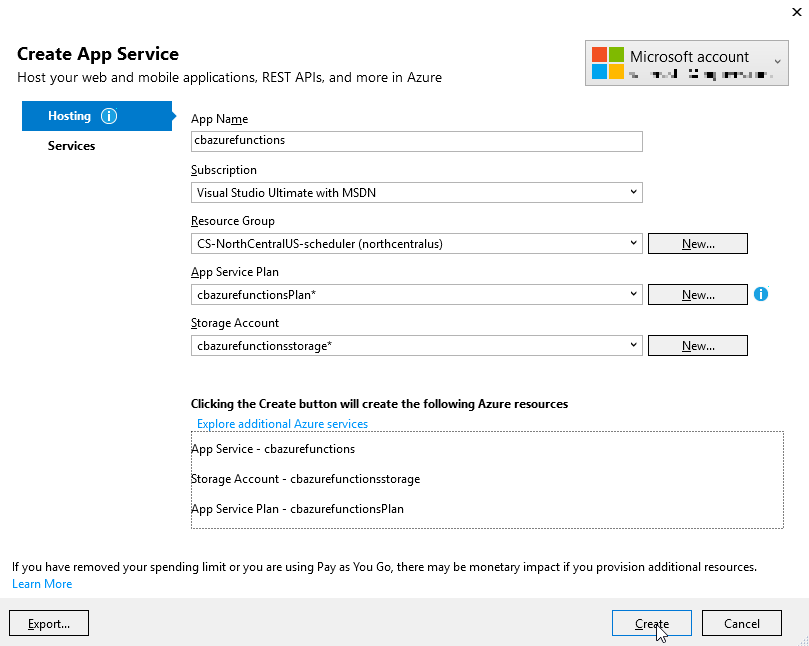
Click "create" and these items will start to be created in Azure (it may take a minute or two).
Trying out the Azure Functions
Finally, remember that the Azure Functions need to know the URI, bucket name, and password in order to connect to Couchbase Server. That information is in local.settings.json, but that file is not used for actual Azure deployments.
In the Azure portal, navigate to the Azure function (I called mine cbazurefunctions), and then select "Application Settings". Under "App settings", enter those three settings: couchbaseUri, couchbaseBucketName, and couchbaseBucketPassword.
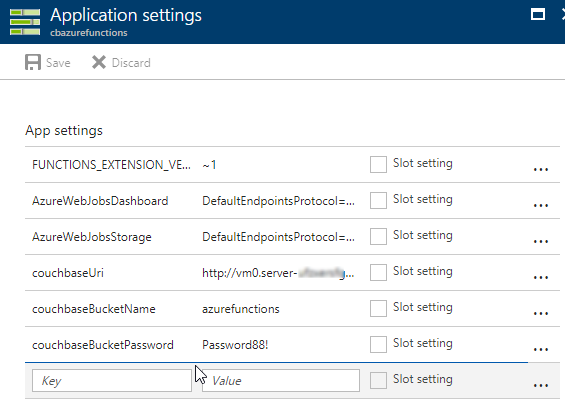
Now, repeat the Postman process mentioned above to try out the Azure functions and make sure they work. Your URL will vary, but mine was http://cbazurefunctions.azurewebsites.net/.
Summary
This is my first time trying out Azure Functions. This blog post shows a simple demo, but there are other factors to consider before you start using this in production:
-
Authentication - I used anonymous Azure Functions to keep it simple. Azure Functions can also provide authentication tokens to use that prevent access except to authorized users.
-
App settings - Setting them manually in the portal may not be the best solution. There is probably a way to automate that portion, and that’s something I’ll look into in the future.
-
HTTPS/TLS - You will likely want to have some level of encryption as you are getting and posting data to your Azure Functions. The above example transmits everything in clear text.
Anything I missed? Any more tips or suggestions to share to make this process easier or better? Please leave a comment below or ping me on Twitter @mgroves.
This is a repost that originally appeared on the Couchbase Blog: Visual Studio Live Unit Testing: New to Visual Studio 2017.
Visual Studio 2017 was just officially released. It comes with a lot of new, great stuff, but one of my favorite new features is built-in Visual Studio Live Unit Testing (available in Visual Studio 2017 Enterprise, not yet available for .NET Core projects).
In this post, I’m going to show you how Visual Studio Live Unit Testing works, as well as some thoughts around using unit tests vs integration tests. You can follow along by getting the full source code for this Live Unit Testing example on GitHub.
Visual Studio Live Unit Testing with NUnit
NUnit is perhaps the most popular testing tool for C#/.NET developers. Visual Studio Live Unit Testing can also work with xUnit and MSTest, but for this post I’m going to just cover NUnit.
To use NUnit, you add it with NuGet, just as normal. To use Visual Studio Live Testing, you’ll also need to add the NUnit Test Adapter (Install-Package NUnite3TestAdapter).
Next, start Live Testing by clicking Test → Live Unit Testing → Start.
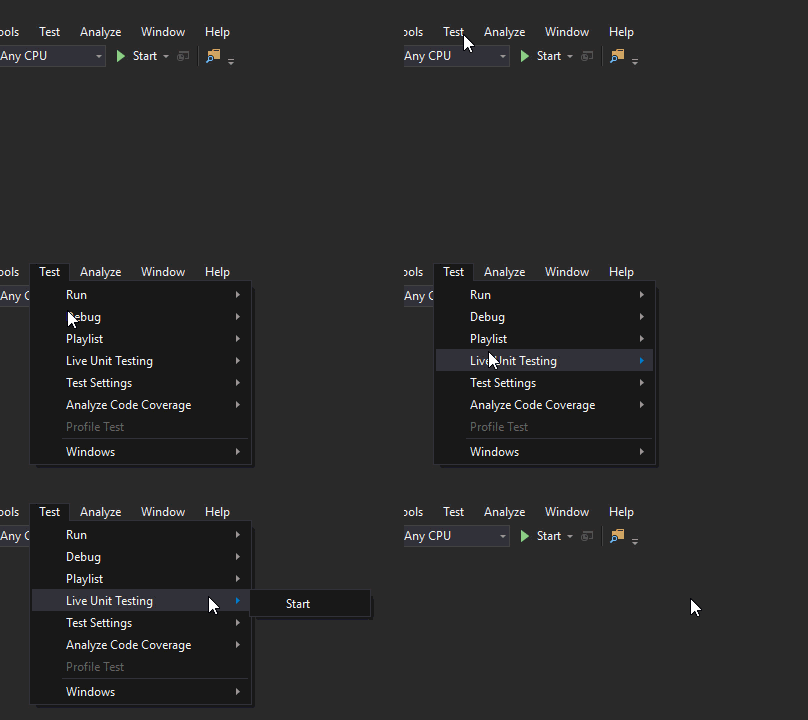
Writing a Unit Test
We’ll need some unit tests to demonstrate. We could just do Assert.That(1, Is.EqualTo(1)), but where’s the fun in that? Let’s create a shopping cart class.
public class ShoppingCart
{
    public string UserName { get; set; }
    public DateTime LastUpdated { get; set; }
    public List<Item> Items { get; set; }
    public decimal Total
    {
        get { return Items.Sum(i => i.Price); }
    }
}
This shopping cart has a couple properties, and a collection of items in it. Notice the Total property. Astute readers may already notice some problems with it, but let’s start with a single, simple unit test to make sure it calculates a total.
[Test]
public void ShoppingCart_Total_Should_Sum_Up_the_Item_Prices()
{
    // arrange: create shopping cart with 2 items and figure out the expected total
    var item1 = new Item { Name = "Large Pepperoni Pizza", Price = 14.99M };
    var item2 = new Item { Name = "Cheese Sticks", Price = 4.99M };
    var expectedTotal = item1.Price + item2.Price;
    var cart = new ShoppingCart { Items = new List<Item> { item1, item2 } };

    // act: user the Total method on ShoppingCart
    var actualTotal = cart.Total;

    // assert: totals should match
    Assert.That(actualTotal, Is.EqualTo(expectedTotal));
}
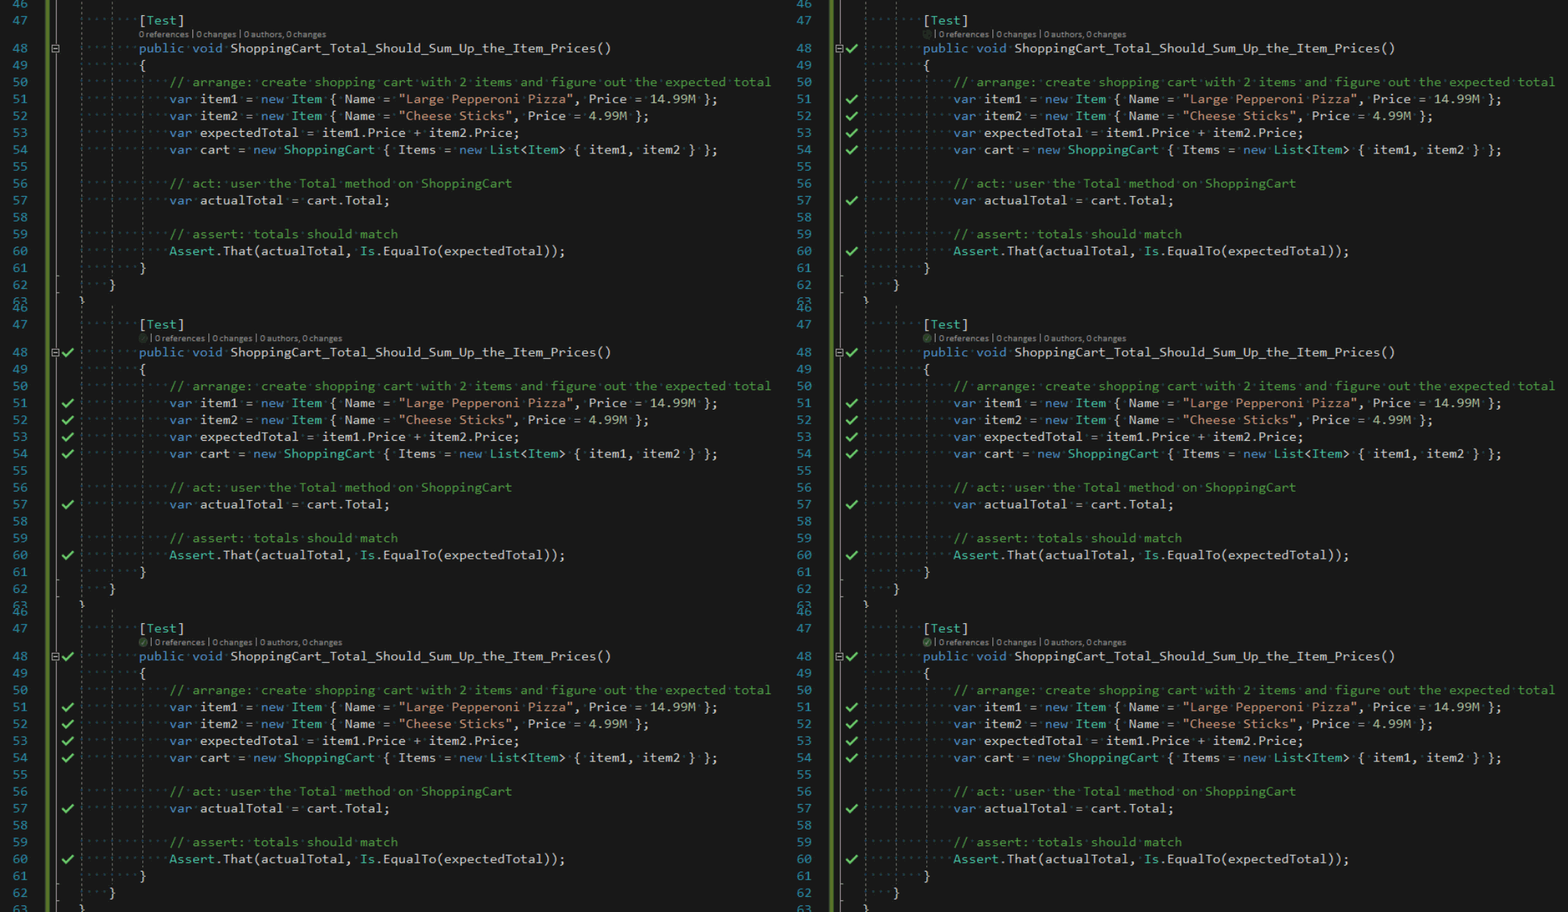
If Live Unit Testing is turned on, then the test is being automatically run in the background by Visual Studio. You should see some green checkmarks appear.
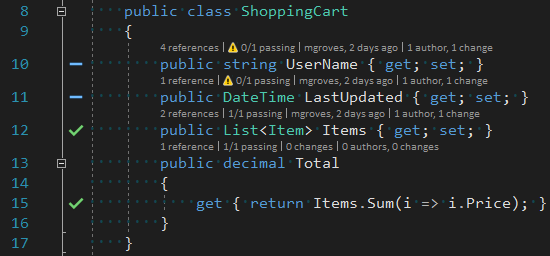
The green checkmarks will also appear wherever the code that is under test is covered.
With Visual Studio Live Unit Testing, you don’t have to stop to run the tests. As you are coding, the tests will run, and give you immediate feedback on whether your code is making tests fail (or whether you’ve written enough code to make your test pass).
Most of all, this will encourage you to write more tests.
What are Integration Tests?
When writing unit tests, you are meant to test a small piece of code on its own. For code that interacts with some external service (a web service, a database, a file system, etc), you often mock those pieces out, so that you can focus on the unit.
You may also write integration tests with NUnit. Integration tests that are meant to go beyond testing a single unit of code, and test that systems work together. Let’s write a method that writes a record to Couchbase Server. This test will use a real database, therefore we can consider it an integration test.
public void SaveShoppingCart(ShoppingCart cart)
{
    _bucket.Insert(new Document<ShoppingCart>
    {
        Id = Guid.NewGuid().ToString(),
        Content = cart
    });
}
This method should save a shopping cart to a document in Couchbase Server. To make sure it’s working, we can write an NUnit test.
[Test]
public void Repo_Can_Save_a_New_Shopping_Cart_to_Database()
{
    // arrange: create a shopping cart
    var cart = new ShoppingCart
    {
        UserName = "Matthew " + Guid.NewGuid().ToString(),
        LastUpdated = DateTime.Now
    };

    // act: save shopping cart to database
    Repo.SaveShoppingCart(cart);

    // assert: check that the cart was saved
    var cartBackOut = Repo.GetCartByUserName(cart.UserName);
    Assert.That(cartBackOut, Is.Not.Null);
    Assert.That(cartBackOut.UserName, Is.EqualTo(cart.UserName));
}
Note: To keep this post simple, I omitted some of the repository details, and test setup. You can view all of this in the GitHub repository.
Integration Tests with Visual Studio Live Unit Testing
Visual Studio Live Unit Testing will happily run this unit test. You may not want these types of tests to be running in the background automatically because:
-
If you don’t have Couchbase Server installed, or a bucket created and indexed, then they will fail.
-
If you have a lot of tests that rely on external components, they could slow down the tests (reading/writing documents in Couchbase is very fast, but setting up a
Clusterobject for each test or test fixture is not). -
These tests could add a lot of unnecessary junk test data to your database.
Excluding Integration Tests from Visual Studio Live Unit Testing
To exclude tests from Live Unit Testing, you can simply right-click on the test file and select "Exclude" from the context menu.
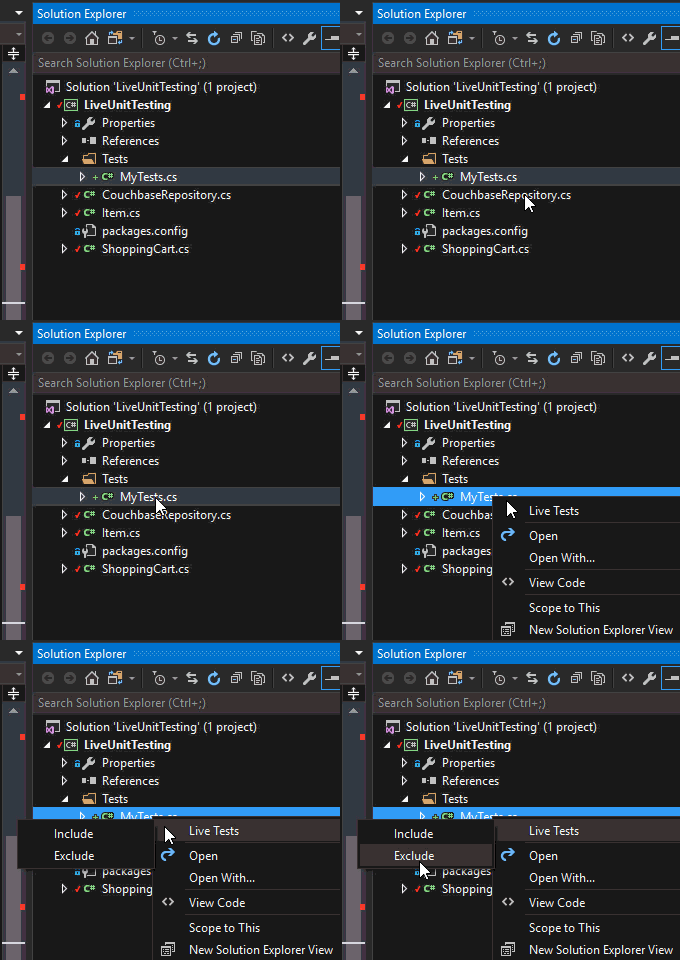
After this, none of the tests in that file will be executed by Live Unit Testing. You can also exclude an entire project. So, if you organize unit tests and integration tests into separate projects, then you are all set.
If you don’t organize them into separate projects, then this process could be a bit tedious. Further, the Include/Exclude information is a local setting that can’t (as of the time I’m writing this, and to the best of my knowledge) be committed to source control.
So, after asking about Live Testing exclusion on StackOverflow, I created an attribute that you can place on tests to exclude them from Live Testing.
public class IgnoreForLiveTesting : Attribute, ITestAction
{
    readonly string _ignoreReason;

    public IgnoreForLiveTesting(string ignoreReason = null)
    {
        _ignoreReason = ignoreReason;
    }

    public ActionTargets Targets { get; set; }

    public void AfterTest(ITest test) { }

    public void BeforeTest(ITest test)
    {
        var isLiveTesting = AppDomain.CurrentDomain.GetAssemblies()
            .Any(a => a.GetName().Name == "Microsoft.CodeAnalysis.LiveUnitTesting.Runtime");
        if (isLiveTesting)
            Assert.Ignore(_ignoreReason ?? "Ignoring this test");
    }
}
This attribute implements the ITestAction interface (which is kinda like Aspect-Oriented Programming/AOP for NUnit, but that’s a topic for a whole other blog post). It will check to see if it’s being run by a LiveUnitTesting process. If it is, it instructs NUnit to ignore the test.
Furthermore, I added an optional ignoreReason to the constructor, so that you can add a helpful note to other people on your team to explain why this test should not be run with Live Unit Testing. You can use it on an integration test like so:
[IgnoreForLiveTesting("Integration Test")]Summary
I’m not terribly pleased with this method, as it’s NUnit specific, and it’s not quite exactly what I was hoping for with Visual Studio Live Unit Testing. But right now I think "the juice is worth the squeeze". Live Unit Testing is such a great feature for writing code, especially Test-Driven Development (TDD), that it’s worth it to have to write and use a special NUnit attribute.
By all means, if you know of a better way to achieve this, I want to know about it. Please leave a comment below or ping me on Twitter @mgroves.
If you have questions about the Couchbase code you saw in this post, I’d be happy to help. Or, you can check out the responsive and knowledgeable community on the Couchbase .NET SDK forum. If you want to learn more about Couchbase, check out the Couchbase Developer Portal.
I blogged last year about my switch from Markdown to AsciiDoc, and that I was using AsciiDocFX.
I still like AsciiDoc, but AsciiDocFX has been getting on my nerves:
- It doesn't have a very good update system. It checks for new versions, but it seems like I have to a) uninstall the old version, b) reinstall the new version, otherwise I get problems. I may be doing it wrong, but this made me want to update less.
- The UI is a little wonky. The live preview sometimes seem to keep its update a few keystrokes behind, meaning that the preview and the document are out of sync. It also tends to get locked up, until I click the Restore button and then Maximize button.
Still, I used it.
But, I built a new computer this week. And I've been setting up my softwares on it. I thought it might be worthwhile to see if there's an AsciiDoc plugin for Visual Studio Code. And, of course there was, because apparently the Code extension ecosystem is booming!
So, I installed AsciiDoc by Joao Pinto, since it came with a live preview. But, it requires me to actually install the asciidoc command line tool.

See?
So, I thought, that should be easy enough. I went to the AsciiDoc site and started following the directions for Windows installation.
Install Ruby
Okay, well now I need to install Ruby. Should be easy enough. I already have Chocolatey NuGet, so I'll just run choco install ruby. No problem. I know that ruby comes with gem, so I should be all set.
Install AsciiDoc
According to AsciiDoc... docs... I just use gem install asciidoctor and that should do the trick.
But, no. It's not that easy. Otherwise I wouldn't be writing this blog. I got an error message:
SSL_connect returned=1 errno=0 state=SSLv3 read server certificate B: certificate verify failed
I'm sure all you Ruby people or Mac people or whatever already know where this is going, but I had no clue. So I googled it. I found a whole bunch of suggestions on StackOverflow. Some solutions made sense but weren't for Windows, and vice versa. I eventually hit upon some random guy's Gist and SSL upgrades on rubygems.org which lead to me this page on rubygems.org about SSL updates.
Fixing RubyGems Certificate Thingy
So, following that literally:
gem install --local C:\rubygems-update-2.6.7.gem
and then
update_rubygems --no-ri --no-rdoc
and finally
gem uninstall rubygems-update -x
So, I guess that fixed... something? It's described in the gist I linked above. But I don't really understand why it's still a problem for a brand new install of ruby. Not complaining! It worked!
Okay, now Install AsciiDoc
So now gem install asciidoctor works. And now I get a live preview of AsciiDoc in Visual Studio Code.

I'll report back after some more time blogging to see if I like this, or if I eventually go back to AsciiDocFx.
UPDATE: As of early April 2017, I've been blogging this way and I'm extremely happy with it. Visual Studio Code keeps getting better, the preview plugin keeps getting better. I've had to introduce a few tweaks in my process, but I've got the whole pipeline semi-automated. It's easy to bring in code samples (thanks to AsciiDoc), easy to post to both the Couchbase blog and this blog, easy to run Yoast on it, and so on. Some day I'll write a blog post explaining the whole process (and hopefully get some good suggestions for streamlining!)

