public class ValuesController : Controller
{
    [HttpGet]
    [Route("api/teams")]
    public IActionResult GetTeams()
    {
        var jsonFile = System.IO.File.ReadAllText("jsonFile.json");
        var teams = JsonConvert.DeserializeObject<List<Team>>(jsonFile);
        return Ok(teams);
    }

    [HttpPost]
    [Route("api/team")]
    public IActionResult PostTeam([FromBody]Team team)
    {
        var jsonFile = System.IO.File.ReadAllText("jsonFile.json");
        var teams = JsonConvert.DeserializeObject<List<Team>>(jsonFile);
        teams.Add(team);
        System.IO.File.WriteAllText("jsonFile.json",JsonConvert.SerializeObject(teams));
        return Ok(team);
    }

// etc...This has been a good year for Cross Cutting Concerns. I had some amazing guests on the podcast. The C# Advent was also way more successful than I anticipated. And I also made some important technical improvements to the site.
Google Analytics
I pulled the top 50 most viewed page from Google Analytics. The top 10 pages that were viewed the most this year are listed below. The C# Advent page got over double the views of the second place page. (The second place page is a post from 2014 on ASP Classic that baffles me with the amount of traffic it gets).
| Page | Pageviews |
|---|---|
| The First C# Advent Calendar (2017) | 5503 |
| Using HTTP/Json endpoints in ASP Classic (2014) | 2413 |
| Command/Query Object pattern (2014) | 2229 |
| How I use Fluent Migrator (2014) | 2010 |
| ActionFilter in ASP.NET MVC - OnActionExecuting (2012) | 1386 |
| Parsing XML in ASP classic (2014) | 974 |
| Visual Studio Live Unit Testing: New to Visual Studio 2017 (2017, Couchbase Blog repost) | 964 |
| AOP vs decorator (2012) | 954 |
| SQL to JSON Data Modeling with Hackolade (2017, Couchbase Blog repost) | 895 |
That's right, some of the most viewed pages on my site have to do with ASP Classic and XML. These are posts I did on a lark during a consulting gig back in 2014.
It always seems like the posts I do on a lark are the ones that take off. For instance, over at the Couchbase Blog, I believe I have the most viewed blog post of 2017 with Hyper-V: How to run Ubuntu (or any Linux) on Windows. This is a quick post I wrote as I was learning it myself, and it keeps raking in the views. It's #2 on Bing and Google when you search for "hyper-v ubuntu", so that helps.
I'm not just looking to raw views, though. I would like to have some measure of the quality of posts. If you know of any metrics that might help track that, please let me know. Google Analytics has a "Bounce Rate" which might be useful to look at. The 10 pages with the lowest bounce rate (out of the 50 most viewed pages) are all podcast posts!
I'm going to speculate and say that podcast pages have the lowest bounce rate because they a prominent and immediately useful call-to-action link (i.e. "listen to this podcast"). Excluding the podcasts, the top 10 links with the lowest bounce rate are:
| Page | Bounce Rate |
|---|---|
| A Coryat scorekeeper for Jeopardy (2014) | 82.35% |
| The First C# Advent Calendar (2017) | 83.30% |
| Autocomplete multi-select of Geographical Places (2014) | 85.39% |
| Lessons learned about Fluent Migrator (2014) | 85.92% |
| AOP in JavaScript with jQuery (2012) | 86.46% |
| Terminology: cross cutting concern (2012) | 86.58% |
| Adventures in Yak Shaving: AsciiDoc with Visual Studio Code, Ruby, and Gem (2017) | 87.42% |
| An Audit ActionFilter for ASP.NET MVC (2012) | 88.13% |
| Using HTTP/Json endpoints in ASP Classic (2012) | 88.95% |
Once again, ASP Classic appears, but it's interesting to see a mostly different set of posts here. The average bounce rate for the top 50 most viewed pages is 90.80%. So these all beat the average (if that has any meaning).
Podcast Analytics
I've done a poor job of tracking podcast analytics since I started the podcast. I assumed I could grab download numbers from Azure (where I host my podcast files), but that turns out to be incredibly painful. I mainly do the podcast for fun and because I want to talk to enthusiatic tech people. But in my attempts to get sponsorship, I quickly realized that I needed a better solution for analytics. I signed up for PodTrac, but only after season 2 was finished. So these numbers aren't going to be very impressive. Season 3 onwards should provide more useful analytics. The top 10 are the 10 latest podcasts that I published (which makes sense).
The #1 most downloaded episode based solely on my better late than never PodTrac analytics is #061 - Eric Elliott on TDD.
Tech improvements
I've made some changes to Cross Cutting Concerns to hopefully improve SEO and your experience as a reader/listener.
- HTTPS. I host this site on a shared website on Azure, so it's not exactly straightforward. But I used CloudFlare and followed this blog post from Troy Hunt.
- HTML Meta. I added Twitter cards, tagging, description, and so forth. This makes my posts look a little nicer on Twitter and search engines, and hopefully will improve my search rankings. If you want to see what I did, hit CTRL+U/View Source right now and check out all the <meta />
- If you clicked on some of the top 10 posts earlier, you might have noticed a new green box with a call to action. I've put this on some of my most popular posts to try and drive some additional engagement, page views, and podcast subscribers.
- Image optimization. pngcrush, gifsicle, and jpegtran losslessly optimize images so they are smaller downloads. This will help with my Azure bill a little bit, and also improve page speed. It's currently a manual process, so sometimes I will forget.
What's next?
Based on the analytics I'm seeing so far, I'm going to:
Continue:
- Reposting my Couchbase blog posts. These help drive traffic back to my employer's site and increase awareness of Couchbase. Which is my job!
- Podcasting. I'm enjoying it, some people are listening to it.
- Keep podcast episodes short. I get comments in person about how the length of the shows (10-15 minutes) is just right. I'm going to expand by a few minutes (see below), but episodes will not increase in length by much more than that (unless I feel like making a longer special episode).
- C# Advent. I've heard that this helps people get traffic to their blogs. I'm definitely happy with it, and it helps the C# / Microsoft MVP community. I'll start recruiting writers a little earlier in November 2018.
Start:
- Adding some more fun to podcast episodes. I've got an idea to add a little humor to each podcast. Stay tuned!
- Podcast sponsorship. I've lined up a sponsor for 6 months of episodes. Let's see how it goes. I'd like to use this money to buy better equipment, pay for hosting, and maybe even purchase tokens of appreciation for guests.
Stop:
- Tracking podcast downloads with Azure and FeedBurner.
- People from using ASP Classic. Somehow.
This is a repost that originally appeared on the Couchbase Blog: Scaling Couchbase Server on Azure.
Scaling is one of Couchbase Server’s strengths. It’s easy to scale, and Couchbase’s architecture makes an efficient use of your scaling resources. In fact, when Couchbase customer Viber switched from Mongo to Couchbase, they cut the number of servers they needed in half.
This blog post is the third in a (loose) series of posts on Azure.
The first post showed you the benefits of serverless computing on Azure with Couchbase.
The second post showed a concrete example of creating a chatbot using Azure functions and Couchbase Server.
The previous post only used a cluster with a single node for demonstration purposes. Now suppose you’ve been in production for a while, and your chatbot is starting to get really popular. You need to scale up your Couchbase cluster. If you deployed Couchbase from the Azure Marketplace, this is a piece of cake. Long story short: you pretty much just move a slider. But this post will take you all the way through the details:
-
Creating a brand new cluster with 3 nodes.
-
Scaling the cluster up to 5 nodes.
-
Scaling the cluster down to 4 nodes.
Create Couchbase Cluster on Azure
Assuming you have an Azure account, login to the portal. If you don’t yet, Getting Started with Azure is Easy and Free.
Once you’re logged in, click "+ New" and search for Couchbase Server in the marketplace. I’m using BYOL (bring your own license) for demonstration, but there is also an "Hourly Pricing" option that comes with silver support.

Once you select Couchbase, you’ll be taken through an Azure installation wizard. Click the "Create" button to get started.
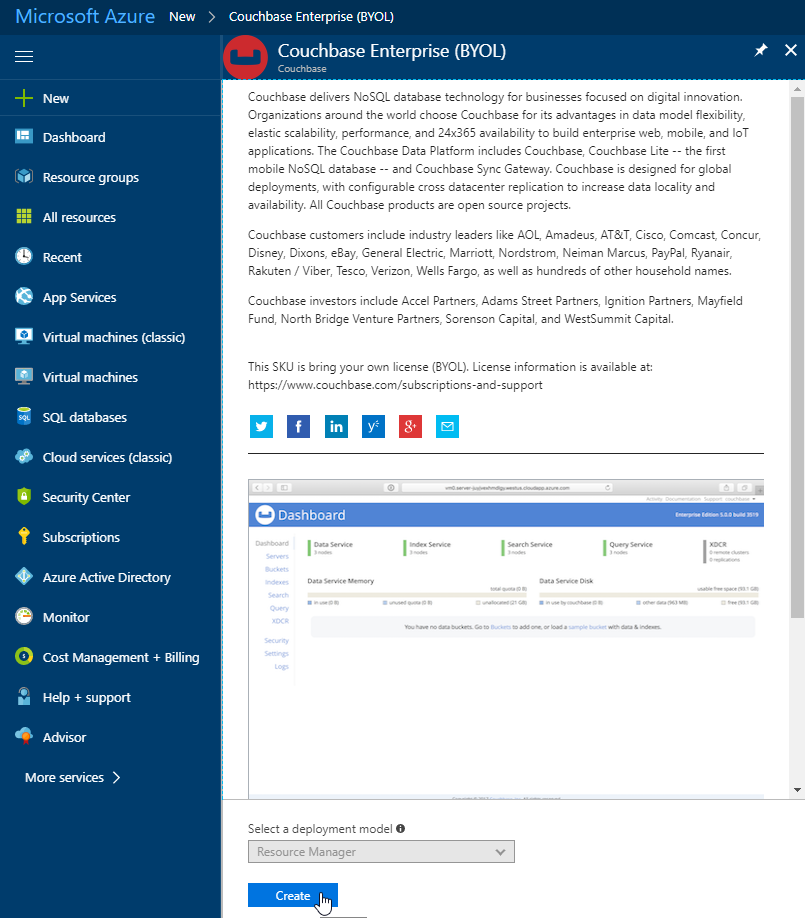
Step 1 is the "Basics". Fill out the username and password you want for Couchbase, the name of a resource group, and a location (I chose North Central US because it is close to me geographically). Make sure to make a note of this information, as you’ll need it later.
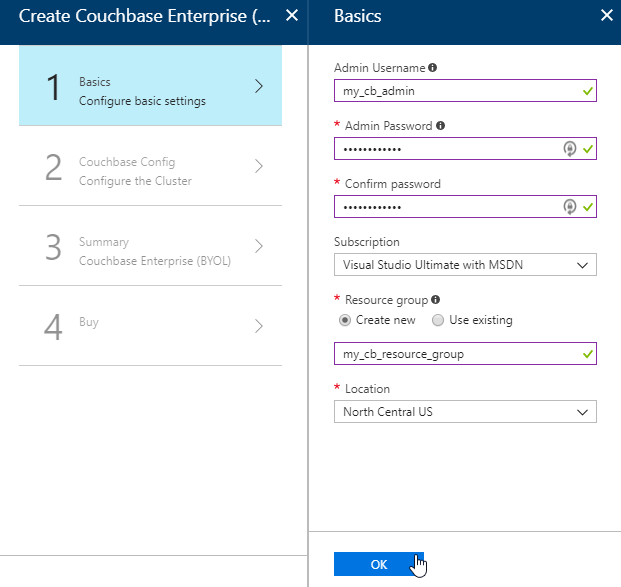
The next step is Couchbase Config. There are some recommended VM types to use. I went with DS1_V2 to keep this blog post cheap, but you probably want at least 4 cores and 4gb of RAM for your production environment. I also elected not to install any Sync Gateway Nodes, but if you plan to use Couchbase Mobile, you will need these too. I’m asking for a total of 3 nodes for Couchbase Server.
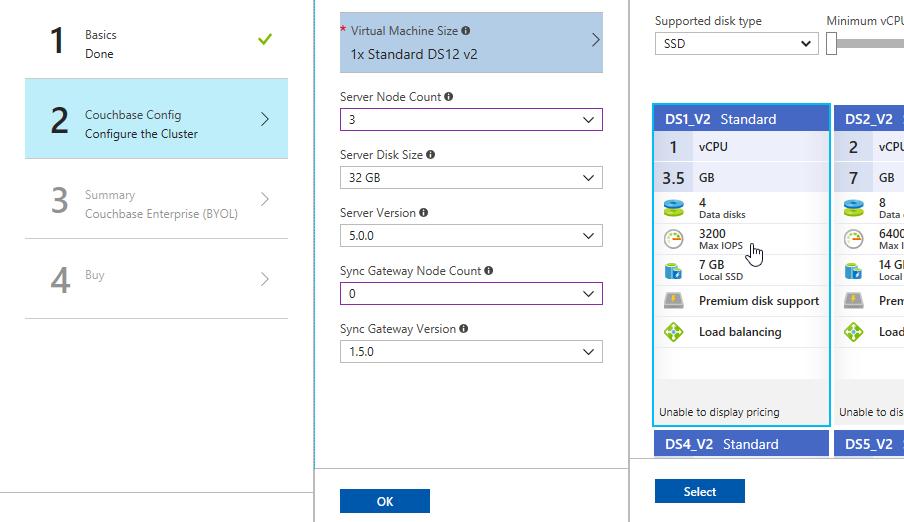
After this, step 3 is just a summary of the information you’ve entered.
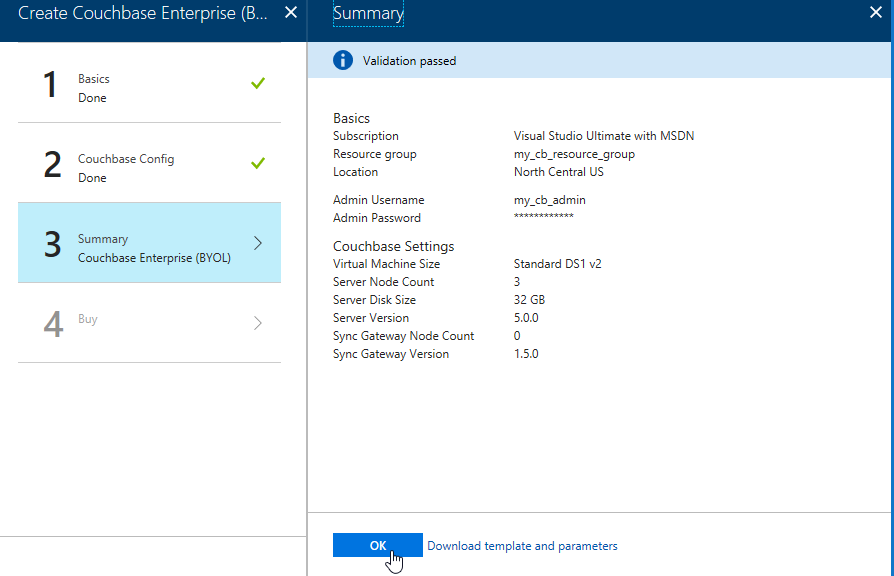
The last step is "buy". This shows you the terms. One "Create" button is all that remains.
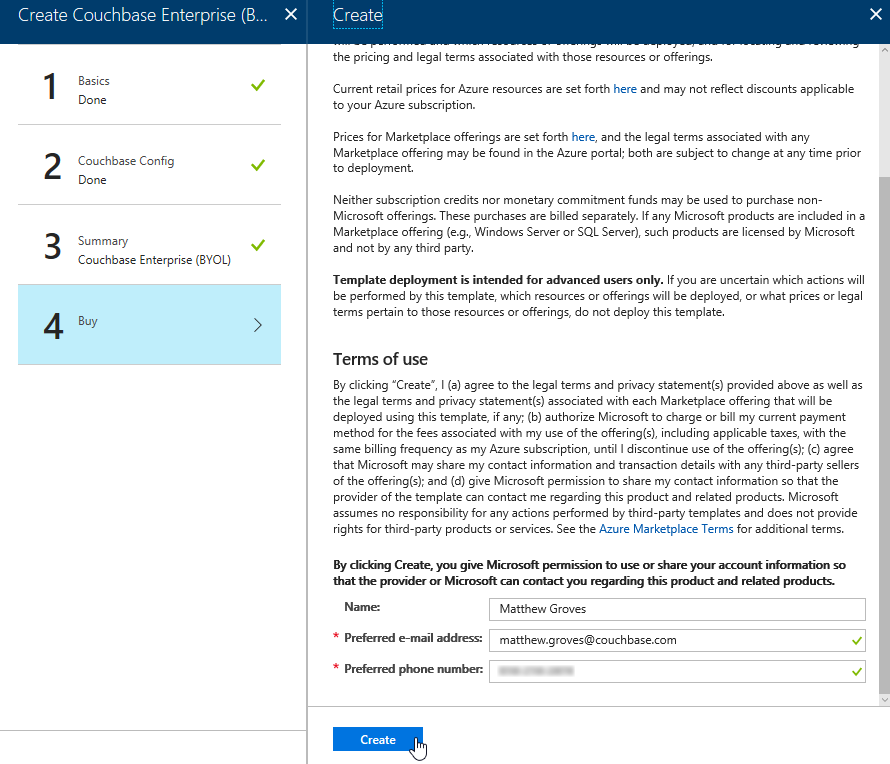
Now, Azure will go to work provisioning 3 VMs, installing Couchbase Server on them, and then creating a cluster. This will take a little bit of time. You’ll get an Azure notification when it’s done.
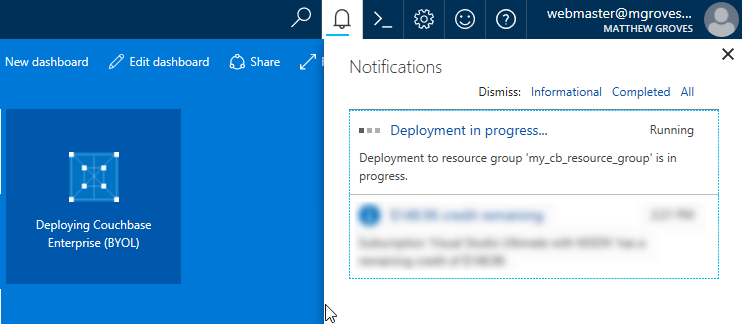
You should have just enough time to get yourself a nice beverage.
Using your Couchbase Cluster
When Azure finishes with deployment, go look at "Resource groups" in the Azure portal. Find your resource group. Mine was called my_cb_resource_group.
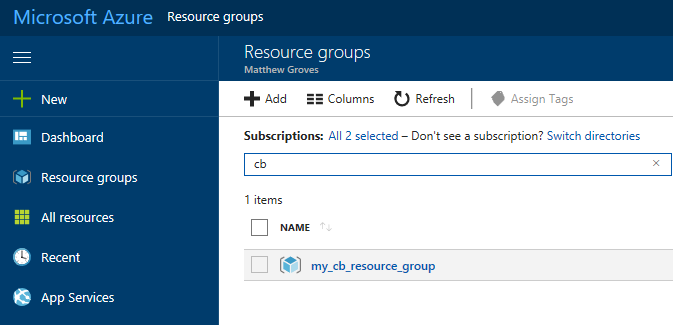
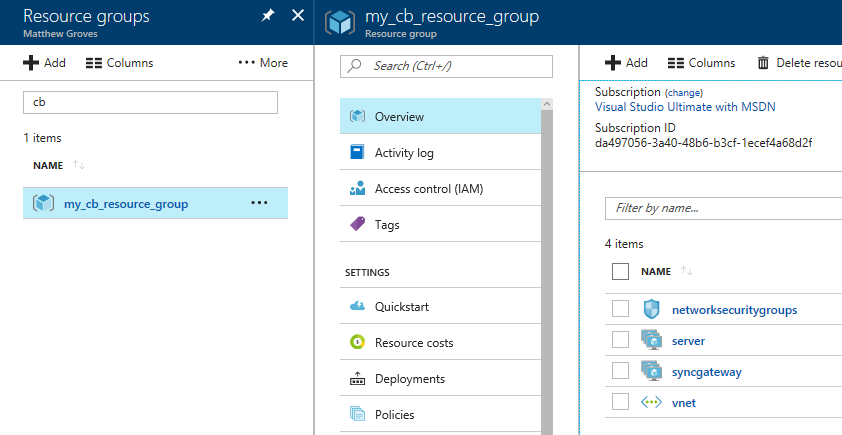
Click on the resource group. Inside that resource group, you’ll see 4 things:
-
networksecuritygroups (these are firewall rules, essentially)
-
vnet (the network that all the resources in the group are on)
-
server (Couchbase Server instances)
-
syncgateway (Couchbase Sync Gateway instances. I didn’t ask for any, so this is an empty grouping)
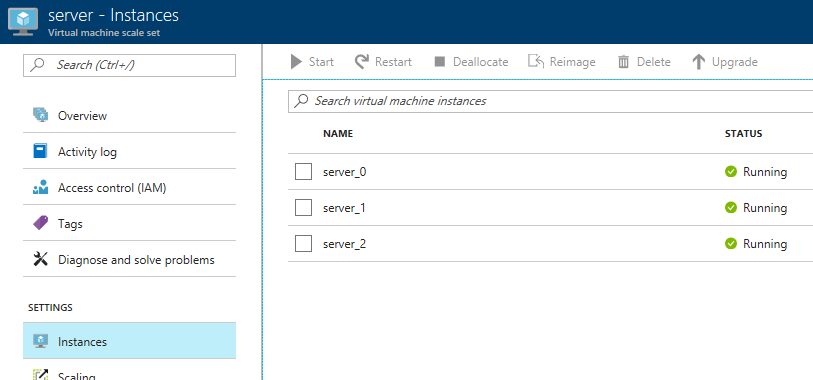
First, click 'server', and then 'instances'. You should see 3 servers (or however many you provisioned).
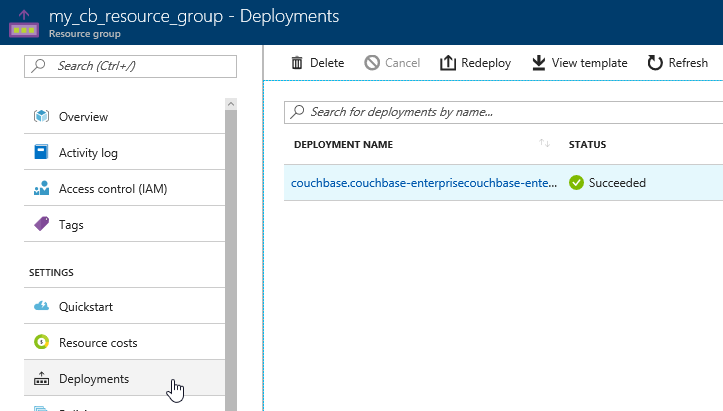
Next, click 'deployments'. You should see one for Couchbase listed. Click it for more information about the deployment.
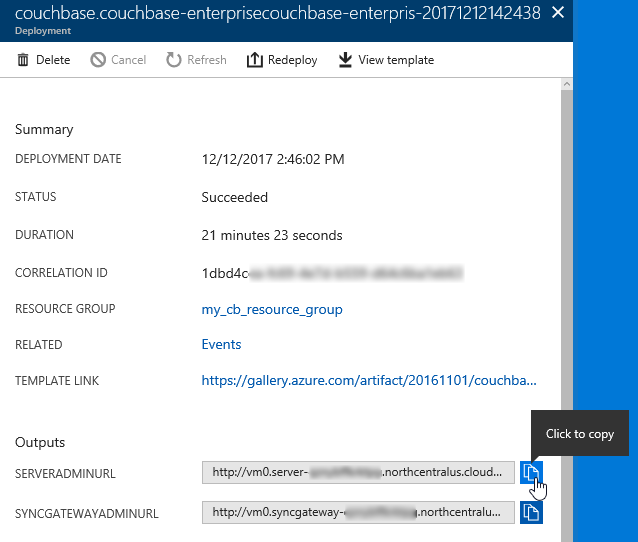
The next screen will tell you the URL that you need to get to the Couchbase Server UI (and Sync Gateway UI if you installed that). It should look something like: http://vm0.server-foobarbazqux.northcentralus.cloudapp.azure.com:8091.
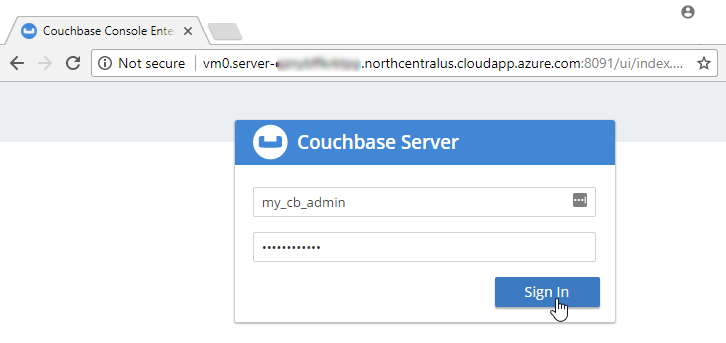
Paste that URL into a browser. You will be taken to the Couchbase Server login screen. Use the credentials you specified earlier to login.
After you login, click on 'servers'. You will see the three servers listed here. The URLs will match the deployments you see in the Azure portal.
Let’s put some data in this database! Go to Settings → Sample Buckets and load the 'travel-sample' bucket.
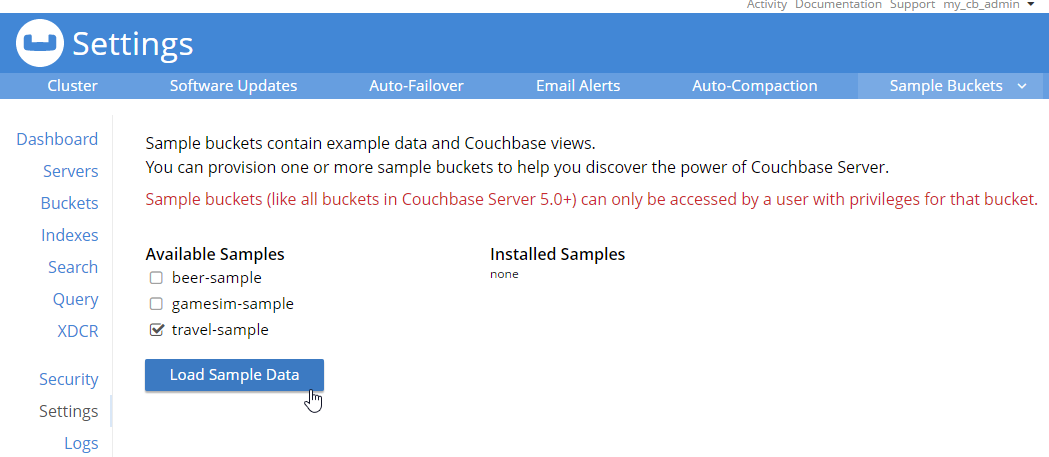
This sample data contains 31591 documents. When it’s done loading, go back to "servers". You can see how the 'items' (and replica items) are evenly distributed amongst the three servers. Each node in Couchbase can do both reads and writes, so this is not a master/slave or a read-only replica sets situation.

Scaling up
Now, let’s suppose your application is really taking off, and you need to scale up to provide additional capacity, storage, performance. Since we’re using Couchbase deployed from the Azure marketplace, this is even easier than usual. Go to the Azure portal, back to the resource group, and click "server" again. Now click "scaling"
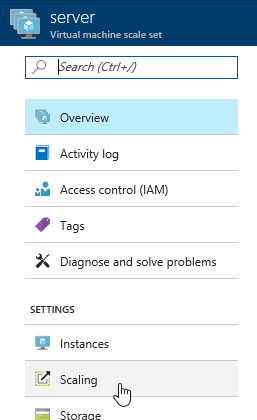
Next, you will see a slider that you can adjust to add more instances. Let’s bump it up to 5 total servers. Make sure to click "save".

Now, go back to 'instances' again. Note: you may have to refresh the page. Azure doesn’t seem to want to update the stale page served to the browser on its own. You will now see server_3 and server_4 in "creating" status.
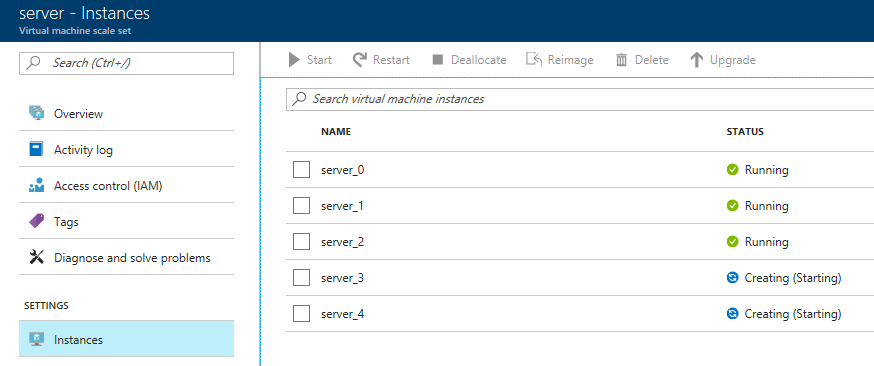
You will need to wait for these to be deployed by Azure. In the meantime, you can go back over to the Couchbase Server UI and wait for them to appear there as well.
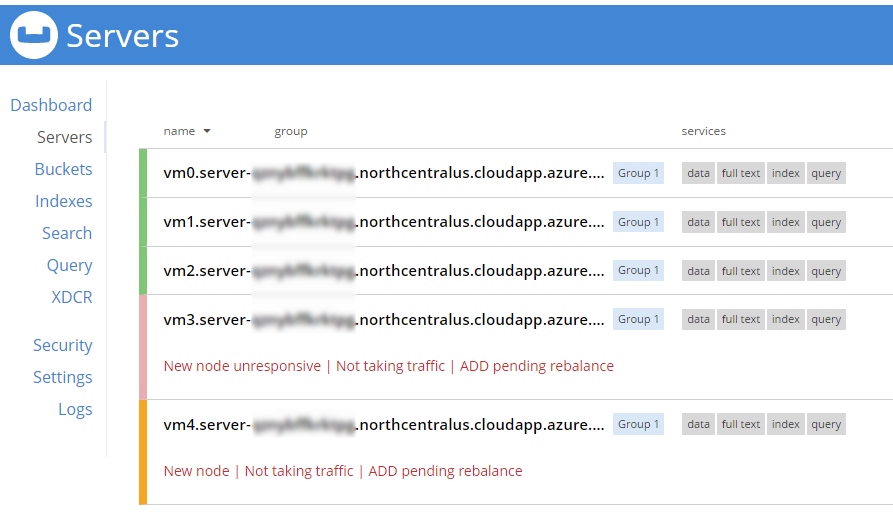
When adding new servers, the cluster must be rebalanced. The Azure deployment should attempt to do this automatically (but just in case it fails, you can trigger the rebalance manually too).
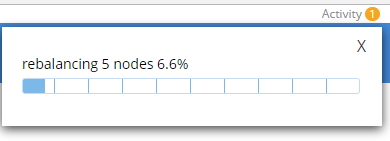
During this rebalance period, the cluster is still accessible from your applications. There will be no downtime. After the rebalance is over, you can see that the # of items on each server has changed. It’s been redistributed (along with replicas).
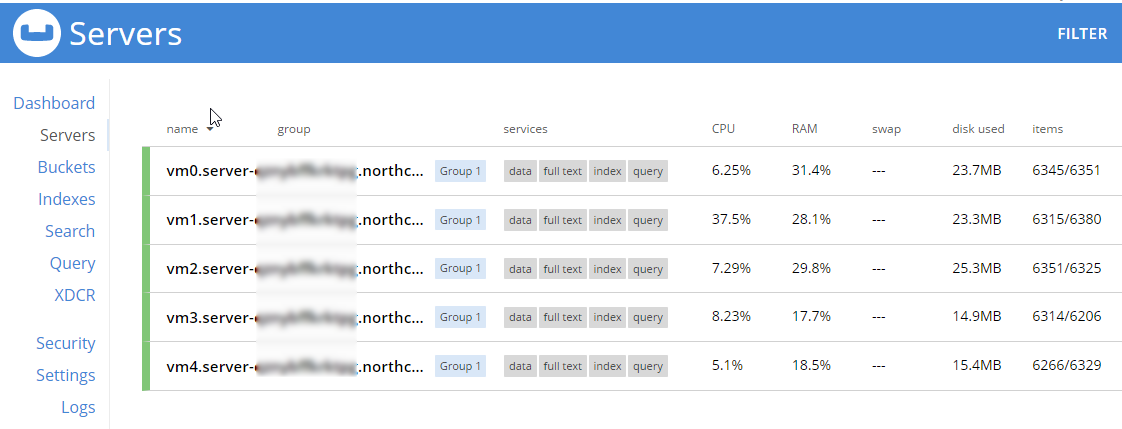
That’s it. It’s pretty much just moving a slider and waiting a few minutes.
Scaling Down
At some point, you may want to scale down your cluster. Perhaps you need 5 servers during a certain part of the year, but you only need 3 for other parts, and you’d like to save some money on your Azure bill.
Once again, this is just a matter of adjusting the slider. However, it’s a good idea to scale down one server at a time to avoid any risk of data loss.

When you scale down, Azure will pick a VM to decommission. Couchbase Server can respond in one of two ways:
-
Default behavior is to simply indicate that a node is down. This could trigger an email alert. It will show as 'down' in the UI.
-
Auto-failover can be turned on. This means that once a node is down, the Couchbase cluster will automatically consider it 'failed', promote the replicas on other nodes, and rebalance the cluster.
I’m going to leave auto-failover off and show the default behavior.
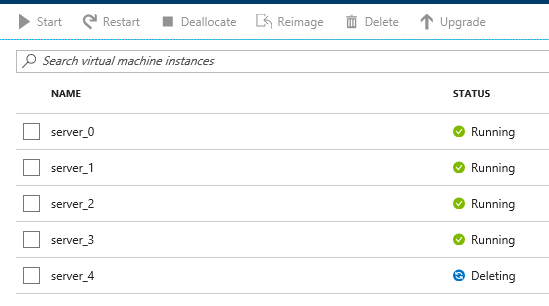
First, the server will show a status of 'deleting' in the Azure portal.
Soon after, Couchbase will recognize that a node is not responsive. It will suggest failover to 'activate available replicas'.
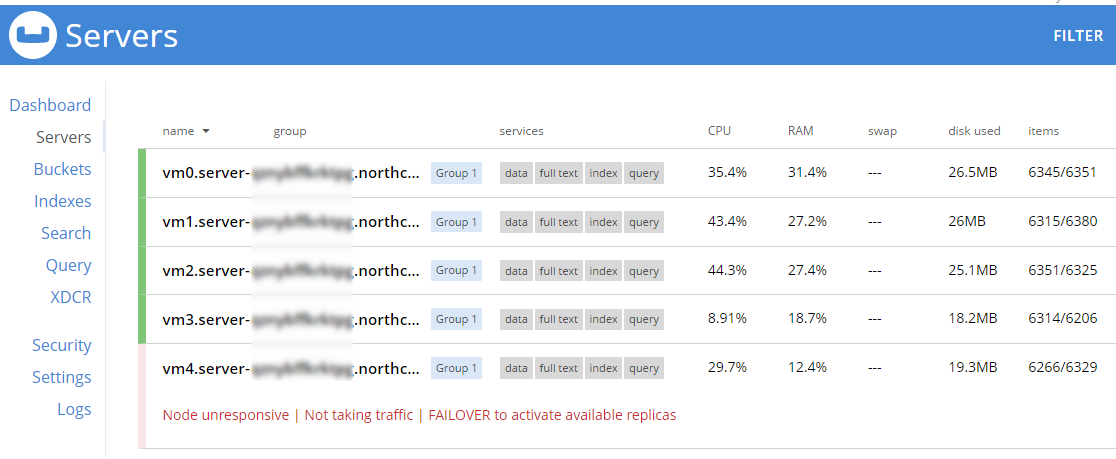
I’ll go ahead and do just that.

Once it’s removed from the cluster, you’ll need to trigger a 'rebalance'.

Summary and resources
Scaling a Couchbase cluster on Azure is simply a matter of using the slider.
If you’re scaling down, consider doing it one node at a time.
For more information, check out these resources:
-
A video by Ben Lackey covering the scaling process of Couchbase on Azure.
-
Make sure to read up on Auto-failover in the documentation.
-
Also check out the documentation on rebalancing.
If you have questions, please contact me on Twitter @mgroves or leave a comment.
Swashbuckle is a handy library to easily bring Swagger support to your ASP.NET Core (or ASP.NET) application. It is especially handy when developing an HTTP based API. It creates a form of interactive documentation based on the OpenAPI Specification.
Before diving into Swashbuckle: Merry Christmas! This blog is being posted on December 25th, 2017. It’s the final post of the very first C# Advent Calendar. Please check out the other 24 posts in the series! This event has gone so well, that I’m already planning on doing it again in 2018. Thank you, again, to everyone who participated (whether you are a writer or you’ve just been following along).
The full source code used in this example is available on Github.
ASP.NET Core HTTP API
I’m going to assume some level of familiarity with ASP.NET Core and creating a REST API. Here’s an example of a GET and a POST. These endpoints are reading/writing from a JSON text file (in a way that is probably not thread-safe and definitely not efficient, but it’s fine for this example).
To try out the GET endpoint, the simplest thing I can do is open a browser and view the results. But to try out the POST endpoint, I need something else. I could install Postman or Fiddler (and you should). Here’s how that would look.
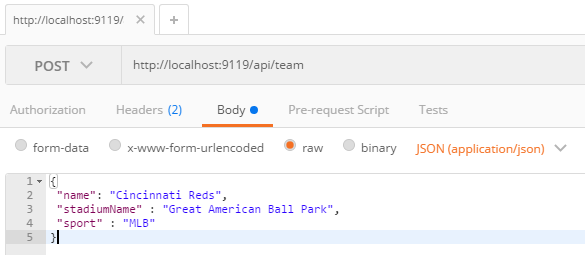
Postman is great for interacting with endpoints, but Postman alone doesn’t really tell us anything about the endpoint or the system as a whole. This is where Swagger comes in.
Swagger
Swagger is a standard way to provide specifications for endpoints. Usually, that specification is automatically generated and then used to generate an interactive UI.
We could write the Swagger spec out by hand, but fortunately ASP.NET Core provides enough information to generate a spec for us. Look at the PostTeam action above. Just from reading that we know:
-
It expects a POST
-
The URL for it is
/api/team -
There’s a
Teamclass that we can look at to see what kind of body is expected
From that, we could construct a Swagger spec like the following (I used JSON, you can also use YAML).
{
	"swagger": "2.0",
	"info": { "version": "v1", "title": "Sports API" },
	"basePath": "/",
	"paths": {
		"/api/team": {
			"post": {
				"consumes": ["application/json"],
				"parameters": [{
					"name": "team",
					"in": "body",
					"required": false,
					"schema": { "$ref": "#/definitions/Team" }
				}]
			}
		}
	},
	"definitions": {
		"Team": {
			"type": "object",
			"properties": {
				"name": { "type": "string" },
				"stadiumName": { "type": "string" },
				"sport": { "type": "string" }
			}
		}
	}
}
But why on earth would you want to type that out? Let’s bring in a .NET library to do the job. Install Swashbuckle.AspNetCore with NuGet (there’s a different package if you want to do this with ASP.NET).
You’ll need to add a few things to Startup.cs:
In the ConfigureServices method:
services.AddSwaggerGen(c =>
{
    c.SwaggerDoc("v1", new Info { Title = "Sports API", Version = "v1"});
});
In the Configure method:
app.UseSwagger();Aside: With ASP.NET, NuGet actually does all this setup work for you.
Once you’ve done this, you can open a URL like http://localhost:9119/swagger/v1/swagger.json and see the generated JSON spec.
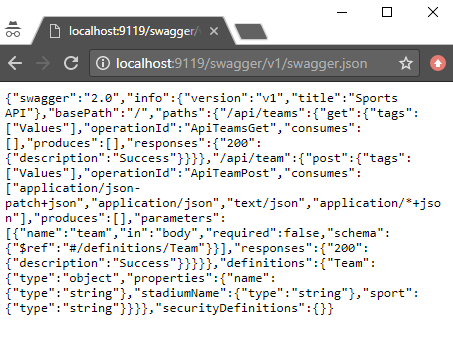
Swagger UI with Swashbuckle
That spec is nice, but it would be even nicer if we could use the spec to generate a UI.
Back in the Configure method, add this:
app.UseSwaggerUI(c =>
{
    c.SwaggerEndpoint("/swagger/v1/swagger.json", "Sports API v1");
});
Now, open your site and go to /swagger:
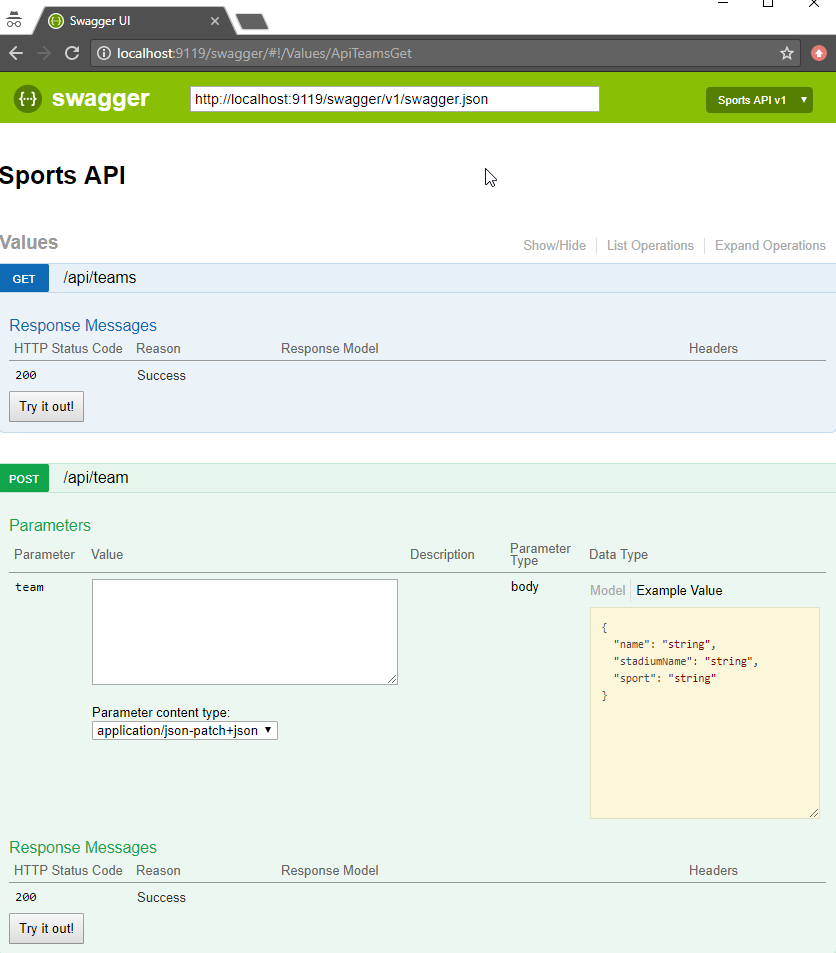
Some cool things to notice:
-
Expand/collapse by clicking the URL of an endpoint (note that you must use
Routeattributes for Swashbuckle to work with ASP.NET Core). -
"Try it out!" buttons. You can execute GET/POST right from the browser
-
The "parameter" of the POST method. Not only can you paste in some content, but you get an example value that acts like a template (just click it).
Giving some swagger to your Swagger
Swagger and Swashbuckle have done a lot with just a little bit. It can do even more if we add a little more information in the code.
-
Response: The
ProducesResponseTypeattribute will let Swagger know what the response will look like (this is especially useful if you are usingIActionResultand/or an endpoint could return different types in different situations). -
Comments: If you are using XML comments, you can have these included with the Swagger output.
services.AddSwaggerGen(c =>
{
    c.SwaggerDoc("v1", new Info { Title = "Sports API", Version = "v1" });
    var filePath = Path.Combine(PlatformServices.Default.Application.ApplicationBasePath, "swashbuckle-example.xml");
    c.IncludeXmlComments(filePath);
});
(Also make sure you XML Documentation output for your project enabled)
Here’s an example of a GetTeams method with both XML comments and ProducesResponseType:
/// <summary>
/// Gets all the teams stored in the file
/// </summary>
/// <remarks>Baseball is the best sport</remarks>
/// <response code="200">List returned succesfully</response>
/// <response code="500">Something went wrong</response>
[HttpGet]
[Route("api/teams2")]
[ProducesResponseType(typeof(Team), 200)]
public IActionResult GetTeams2()
{
    var jsonFile = System.IO.File.ReadAllText("jsonFile.json");
    var teams = JsonConvert.DeserializeObject<List<Team>>(jsonFile);
    return Ok(teams);
}-
Customize your info: there’s more to the
Infoclass than just Title and Version. You can specify a license, contact, etc.
services.AddSwaggerGen(c =>
{
    c.SwaggerDoc("v1", new Info
    {
        Title = "Sports API",
        Version = "v1",
        Description = "An API to list and add sports teams",
        TermsOfService = "This is just an example, not for production!",
        Contact = new Contact
        {
            Name = "Matthew Groves",
            Url = "https://crosscuttingconcerns.com"
        },
        License = new License
        {
            Name = "Apache 2.0",
            Url = "http://www.apache.org/licenses/LICENSE-2.0.html"
        }
    });
    var filePath = Path.Combine(PlatformServices.Default.Application.ApplicationBasePath, "swashbuckle-example.xml");
    c.IncludeXmlComments(filePath);
});
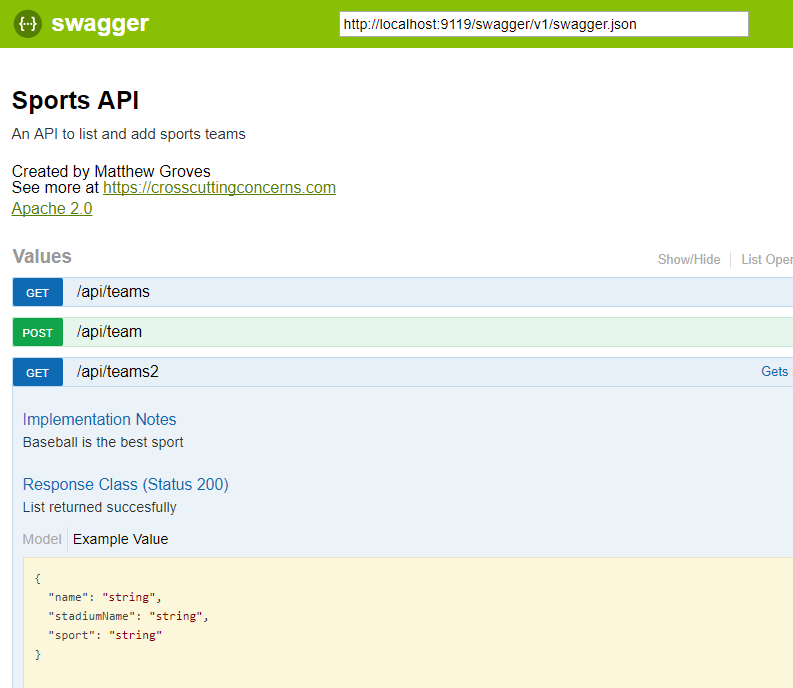
Here’s a screenshot of the UI that has all three of the above enhancements: response type, XML comments, and more customized info.
Summary
Working on HTTP-based APIs? Bring Swashbuckle and Swagger into your life!
More resources:
-
I recorded a couple of videos on getting started with Couchbase that feature Swashbuckle. Check out ASP.NET with Couchbase: Getting Started and ASP.NET Core with Couchbase: Getting Started
-
Swashbuckle for ASP.NET (Github)
-
Swashbuckle for ASP.NET Core (Github)
Thanks again for reading the 2017 C# Advent!
This is a repost that originally appeared on the Couchbase Blog: Chatbot on Azure and Couchbase for Viber.
A chatbot can be a novel way to interact with users. After writing a post introducing the basics of serverless, and also writing a post on writing Azure Functions, I decided I would try to build something a little more practical than a "hello, world".
Using a serverless architecture for a chatbot makes sense. Chatbot usage may be sporadic. Usage may peak and drop at various times of the day. By using serverless, you’ll only be paying for the resources and time that you need.
If you want to follow along, all the source code for this blog post is available on Github.
Viber Chatbot
I could have chosen a lot of different platforms to create a chatbot for: Facebook Messenger, Skype, WhatsApp, and more. But I decided to go with Viber.
In the United States, Viber doesn’t seem to have a huge following, but I’ve been using it a lot. It’s a very handy way to chat with my wife, send pictures, funny GIFs, and so on. I find it to be more reliable and faster than SMS, especially for pictures. I wish everyone in my family was using it! It’s also a nice side effect that Viber is a Couchbase customer. They switched from MongoDb to support their growing data needs.
Also, Viber’s REST API is simple and well documented. Between the use of serverless architecture and Viber’s API, I couldn’t believe how fast I went from 0 to chatbot.
Setup
First, You’ll need to start by creating a bot in Viber (you’ll need a Viber account at some point). Viber will give you an API key that looks something like 30a6470a1c67d66f-4207550bd0f024fa-c4cacb89afc04094. You’ll use this in the HTTP headers to authenticate to the Viber API.
Next, create a new Azure Functions solution. I’ve previously blogged about Azure Functions with a followup on Lazy Initialization.
I decided to use C# to write my Azure Functions. Unfortunately, there is no .NET SDK for Viber (as far as I know), so I’ll have to use the REST API directly. Not a big deal, I just used RestSharp. But if you prefer NodeJS or Python, Viber has got you covered with SDKs for those languages.
Before you start coding, you’ll need to setup a Webhook. This is simply a way of telling Viber where to send incoming messages. You’ll only need to do this at the beginning. I did this by first deploying a barebones Azure Function that returns a 200. I used Postman to set the initial webhook.
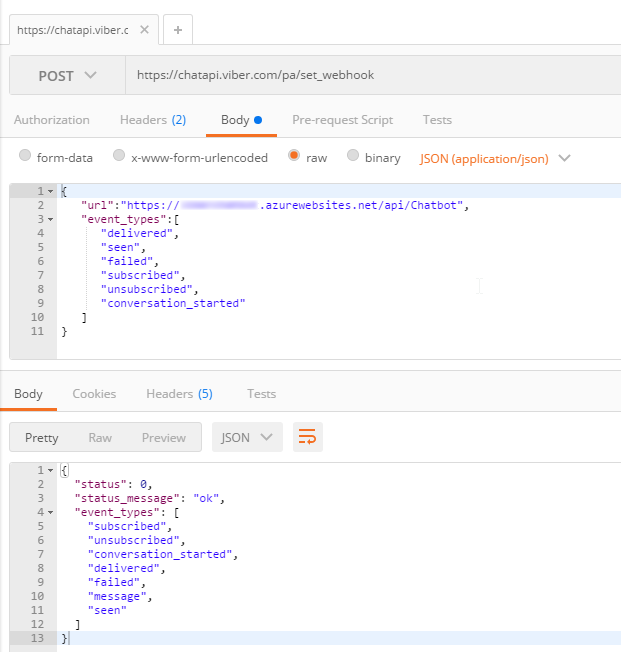
Finally, I setup a Couchbase cluster on Azure. Getting started with Couchbase and Azure is easy and free. (You can even use the "Test Drive" button to get 3 hours of Couchbase Server without expending any Azure credit). I created a single user called "viberchatbot", a bucket called "ViberChatBot", and I loaded the "travel-sample" bucket.
Azure Function
For this application, I wanted to create a chatbot with a little more substance than "Hello, world" and I also wanted to have a little fun. Here are the commands I want my chatbot to understand:
-
If I say "hi" (or hello, etc), it will respond with "Howdy!"
-
If I ask for "metrics", it will tell me how many messages it’s processed so far.
-
If I mention "twitter", it will make a recommendation about who to follow.
-
If I ask for flights from CMH to ATL (or other airports) it will tell me how many flights there are today (I will use the travel-sample bucket for this data).
-
If I say "help", it will give me a list of the above commands.
I decided not to use any natural language processing or parsing libraries. I’m just going to use simple if/else statements and some basic string matching. If you are planning to create a robust chatbot with rich capabilities, I definitely recommend checking out libraries and tools like LUIS, wit.ai, NLTK and others.
Chatbot code
I started by creating a few C# classes to represent the structure of the data that Viber will be sending to my serverless endpoint.
Viber classes
This is not an exhaustive representation of Viber’s capabilities by far, but it’s enough to start receiving basic text messages.
public class ViberIncoming
{
    public string Event { get; set; }
    public long Timestamp { get; set; }
    public ViberSender Sender { get; set; }
    public ViberMessage Message { get; set; }
}

public class ViberSender
{
    public string Id { get; set; }
    public string Name { get; set; }
}

public class ViberMessage
{
    public string Text { get; set; }
    public string Type { get; set; }
}
Next, the Azure function will convert the raw HTTP request into a ViberIncoming object.
[FunctionName("Chatbot")]
public static async Task<HttpResponseMessage> Run(
    [HttpTrigger(AuthorizationLevel.Anonymous, "get", "post", Route = null)]HttpRequestMessage req,
    TraceWriter log)
{
    var incoming = req.Content.ReadAsAsync<ViberIncoming>().Result;

    var viber = new ViberProcessor(Bucket.Value);
    viber.Process(incoming);

    // return "OK" each time
    // this is most important for the initial Viber webhook setup
    return req.CreateResponse(HttpStatusCode.OK);
}
After this, I created a ViberProcessor class with a Process method that receives this object.
public void Process(ViberIncoming incoming)
{
    if (incoming?.Message?.Type == "text")
    {
        LogIncoming(incoming);
        ProcessMessage(incoming);
    }
}
Processing Viber messages
LogIncoming creates a record (in Couchbase) so that I know everything about each request that comes in.
ProcessMessage will analyze the text of the message and figure out what to do in response. You can check out the complete code on Github, but here’s a brief snippet to give you the idea:
// if the message contains "hi", "hello", etc say "howdy"
else if (HelloStrings.Any(incoming.Message.Text.ToLower().Contains))
    SendTextMessage("Howdy!", incoming.Sender.Id);
// if message contains "?" then link to the forums
else if (incoming.Message.Text.Contains("?"))
    SendTextMessage("If you have a Couchbase question, please ask on the forums! http://forums.couchbase.com", incoming.Sender.Id);
else
    SendTextMessage("I'm sorry, I don't understand you. Type 'help' for help!", incoming.Sender.Id);
Getting metrics
One of things my chatbot listens for is "metrics". When you ask it for metrics, it will give you a count of the incoming messages that it’s processed. Since I’m logging every request to Couchbase, querying for metrics is easily done with a N1QL query.
private string GetMetrics()
{
    var n1ql = @"select value count(*) as totalIncoming
                from ViberChatBot b
                where meta(b).id like 'incoming::%';";
    var query = QueryRequest.Create(n1ql);
    var response = _bucket.Query<int>(query);
    if (response.Success)
        return $"I have received {response.Rows.First()} incoming messages so far!";
    return "Sorry, I'm having trouble getting metrics right now.";
}
Sending a message back
The chatbot needs to communicate back to the person who’s talking to it. As I said earlier, there is no Viber .NET SDK, so I have to create a REST call "manually". This is easy enough with RestSharp:
private void SendTextMessage(string message, string senderId)
{
    var client = new RestClient("https://chatapi.viber.com/pa/send_message");
    var request = new RestRequest(RestSharp.Method.POST);
    request.AddJsonBody(new
    {
        receiver = senderId,    // receiver	(Unique Viber user id, required)
        type = "text",          // type	(Message type, required) Available message types: text, picture, etc
        text = message
    });
    request.AddHeader("X-Viber-Auth-Token", ViberKey);
    var response = client.Execute(request);

    // log to Couchbase
    _bucket.Insert("resp::" + Guid.NewGuid(), response.Content);
}
Note that I’m also logging each response from Viber to Couchbase. This could be very useful information for later analysis and/or troubleshooting. If Viber decides to change the structure and content of their response, the data in Couchbase is all stored as flexible JSON data. You will not get surprise errors or missing data at this ingestion point.
Summary
That’s all the basics. Check out the source code for the complete set of actions/operations that the chatbot can do. To test out the bot, I used my Viber app for Android on my phone (and my wife’s, to make sure it worked when I went public).
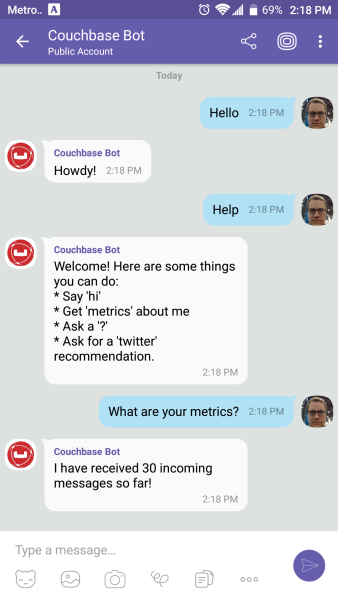
Beware: by the time you read this, the chatbot I created will likely be taken offline. Anyone else who creates a "Couchbase Bot" is not me!
Here’s a recap of the benefits of this approach to creating a chatbot:
-
The serverless approach is a good way to control costs of a chatbot. Whether it’s Viber or some other messaging platform, there is potential for sporadic and cyclic use.
-
Viber’s REST API utilizes JSON, which makes Couchbase a natural fit for tracking/storing/querying.
-
Couchbase’s ease of scaling and partnerships with Microsoft (and Amazon and Google) make it a great choice for a chatbot backend.
This was really fun, and I could definitely get carried away playing with this new chatbot. It could analyze images, tell jokes, look up all kinds of information, sell products and services, or any number of useful operations.
I would love to hear what you’re doing with chatbots! Please leave a comment or contact me on Twitter @mgroves.
This is a repost that originally appeared on the Couchbase Blog: Serverless Architecture with Cloud Computing.
Serverless is one of the new buzz words that you’ve probably heard. It refers to a type of deployment where the server is abstracted away. It doesn’t mean there aren’t servers, just that you don’t have to provision the servers yourself. We’ll explore this in the post.
In some cases, serverless can free your enterprise from the costs of maintaining infrastructure, upgrades, and provisioning servers. In this post, we’ll explore the basics of what serverless is, how it differs from microservices (another buzzword), some possible benefits, and how Couchbase Server fits into the picture.
What is Serverless?
With serverless, you simply write code (usually in form of functions/methods). You can do so with many popular languages, including C#, JavaScript (Node), Java, and so on. This code is deployed to a cloud provider like Microsoft Azure, Amazon Web Services (AWS), Google Cloud Platform (GCP), and more.
Your code is triggered by events. Events can be as simple as HTTP requests, or they could be many other types of events, depending on what the cloud platform supports. (Azure, for instance, supports Timer, GitHub, etc).
Within the cloud, the servers that execute that code are automatically provisioned (and decommissioned) by the cloud provider on an as-needed basis.
You might also see the terms BaaS (Backend as a Service) or FaaS (Function as a Service). Recently, the meaning of the "serverless" buzz word has been expanded, but this post mainly focuses on FaaS/BaaS cloud services.
Serverless vs Microservices
There are some similarities between serverless and microservices, but they are not the same thing. Both are approaches to break an application into smaller, independent pieces. They differ in what is deployed and what you manage.
As an example, if you are using a microservice architecture, you might have a "shopping cart" service (in addition to other services like "user profile", "inventory", etc). Here’s a diagram of a very simple microservice.
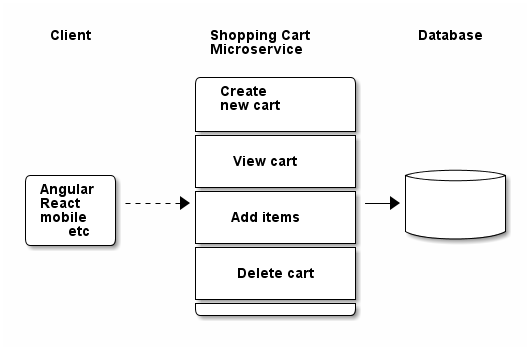
Notice some properties of the microservice:
-
Its responsibility pertains only to the shopping cart. It is not a complete application by itself.
-
The service contains a number of possible operations, but they are all part of the service.
-
The microservice communicates with a database (possibly a dedicated database) to complete operations.
-
The microservice deployed to the cloud may use a VM that requires provisioning. Even while this service is idle, you’ll be charged for VM time.
Contrast this with a similar set of features, this time created with a serverless approach.

In the serverless architecture,
-
There are 4 functions which can be deployed separately (instead of 1 service)
-
Each function is able to communicate with the database
-
You don’t have to provision a VM, you just deploy a function.
-
The function only consumes resources when needed (and you are only charged for actual use, not idle time)
Shown in the above diagram are only standard HTTP requests. You could also use a Timer event, for instance, to check every 5 minutes to see if there are any abandoned shopping carts.
Benefits of Serverless
There are some benefits (and trade-offs) when using a serverless architecture.
One benefit is that scalability is handled by the cloud provider. If demand or usage increases, the cloud provider can compensate by adding more server(s) when necessary.
Another benefit is that costs are tied to usage. If you have a service that is constantly in use, you might not see any benefits. But if you have a service that is sporadically used, then serverless may provide cost savings.
Finally, it’s possible that a serverless architecture can reduce administration costs. You don’t need to wait for a server to be commissioned. This may improve agile iteration if commissioning VMs or servers are time consuming. It can reduce your need for IT operations, at least initially, because there are no servers to deploy, fewer servers to manage/upgrade/etc. All this may lead to improved developer productivity.
It’s important to note that serverless is not a silver bullet. Your application may not be a good fit for this kind of decomposition. Also, if you end up deploying a large number of serverless functions, you will still need operations people to manage, monitor, and test your functions. Definitely check out the benefits and drawbacks in detail at MartinFowler.com.
Couchbase and Serverless together
There are several popular serverless providers:
-
Microsoft Azure Functions
-
Amazon AWS Lambda
-
Google Cloud Platform Cloud Functions
Couchbase Server has partnered with each of these major cloud providers and can run on any of those platforms. In addition, you can run Couchbase Server across multiple cloud vendors for improved reach, disaster recovery, and diversification. You can also use Couchbase Server in a hybrid-cloud situation (a mix of cloud and on-premises).
This makes Couchbase a great choice when you need a NoSQL document database, no matter your cloud strategy:
No vendor lock in. With Couchbase, you aren’t even locked into the cloud, much less a single cloud vendor. With XDCR, you can go cloud-first, and have an on-premises cluster for disaster recovery, or deploy Couchbase to multiple clouds.
Cloud marketplace offerings. You can get started in minutes: on Microsoft Azure, AWS, or GCP.
Tools for your programming language. Couchbase offers SDKs for Node.js, .NET, Java, PHP, Python, Go, C/C++, as well as community support for many others. No matter your serverless platform or language preferences, Couchbase has you covered. Check out this blog post on Azure Functions with Couchbase Server for a technical intro using .NET/C#/Azure.
Scaling. With Couchbase Server, scaling is easy and efficient. Couchbase’s architecture is designed for scaling, with built-in replication, autosharding, and data distribution. Every node in a Couchbase cluster can do both reads and writes, providing efficient use of computing resources and high availability.
Flexibility of JSON. Many apps can benefit from a flexible schema, even if you’re using a relational database. Check out this whitepaper on why Couchbase is the engagement database that can work alongside your transactional and analytical database to provide an exceptional customer experience.
Summary
Serverless takes decomposition of your application back-end one step further.
Storing JSON data in Couchbase Server gives you flexibility with both schema and scaling.
Is serverless right for you? It’s not a silver bullet, but if you’re interested in benefiting from lower costs and easier deployment, we’d be happy to help you create a careful plan and discuss whether or not it’s a right fit for your application. You can contact me by leaving a comment, or finding me on Twitter @mgroves.
